Build a Trip Plan Assistant with React and AI
This tutorial demonstrates how to build an AI-driven trip plan assistant app. This app uses react to build frontend webpages, HTTP Element as the API endpoint and LLMExecutor to call OpenAI models with pre-defined prompt.
Requirements
- User input destination, duration, interests and special requirements through a form.
- User click submit and the page will display suggested trip plan.
Analysis
The requirements are simple. We need a webpage for both the form and the result from backend. We need a backend to handle the form submission. We need a prompt with parameter values from the form and call OpenAI model e.g. gpt-3.5 to generate the trip plan and return to frontend.
Building the App
-
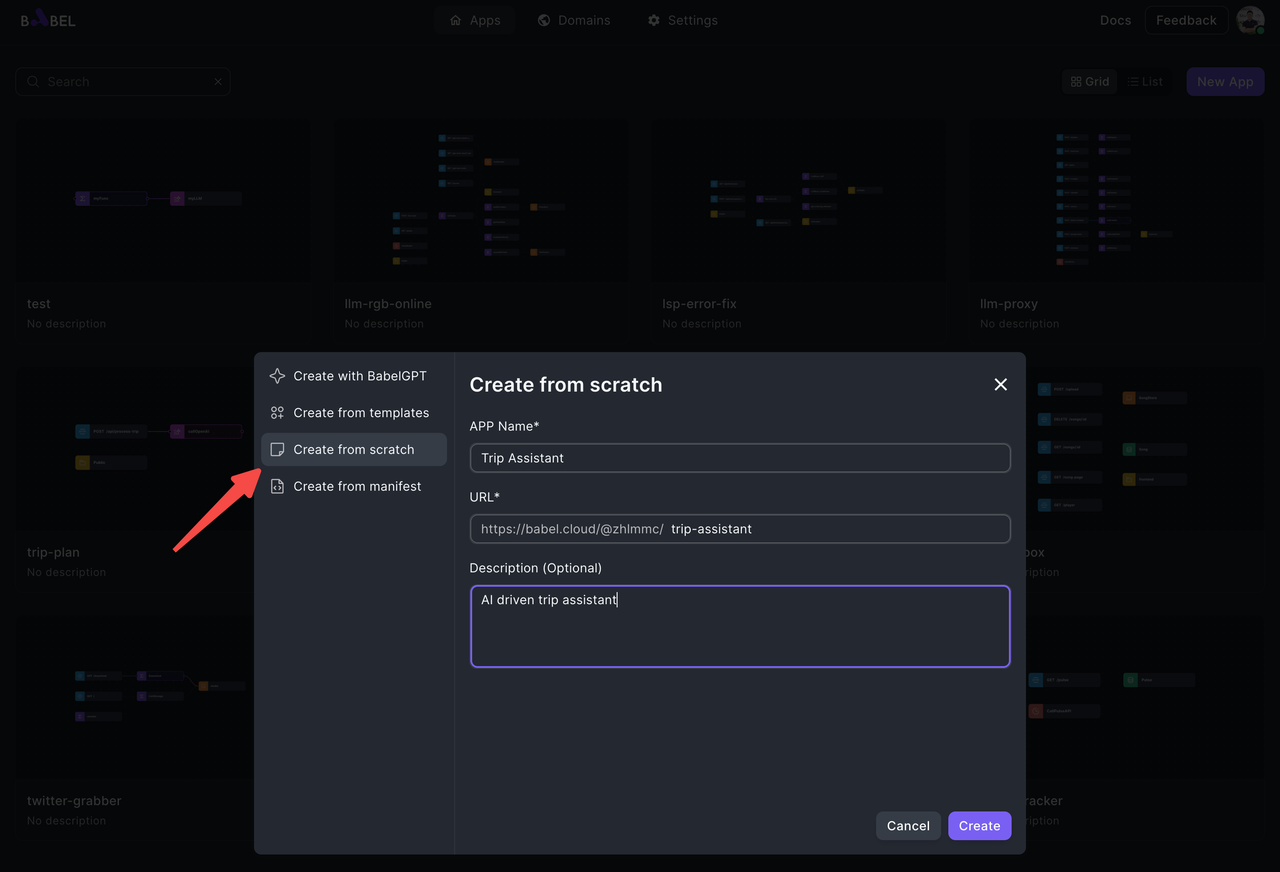
Create a new Babel application from scratch
-
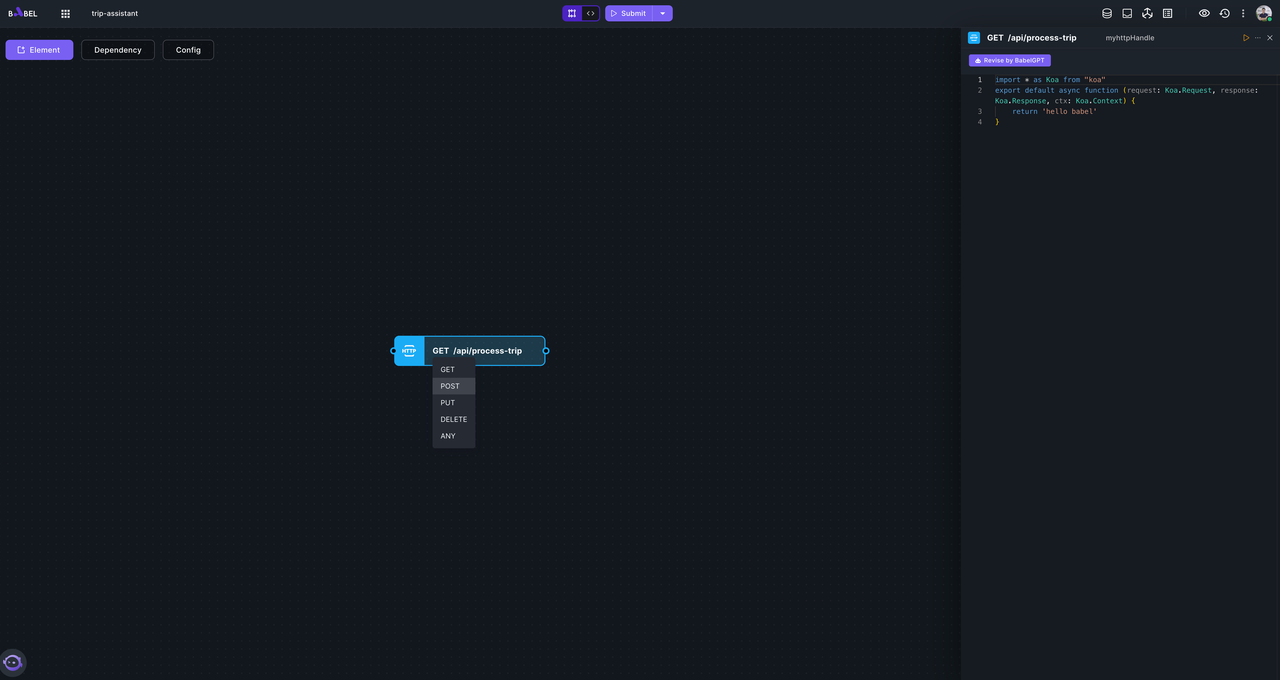
Add a HTTP element, processing POST request /api/process-trip
-
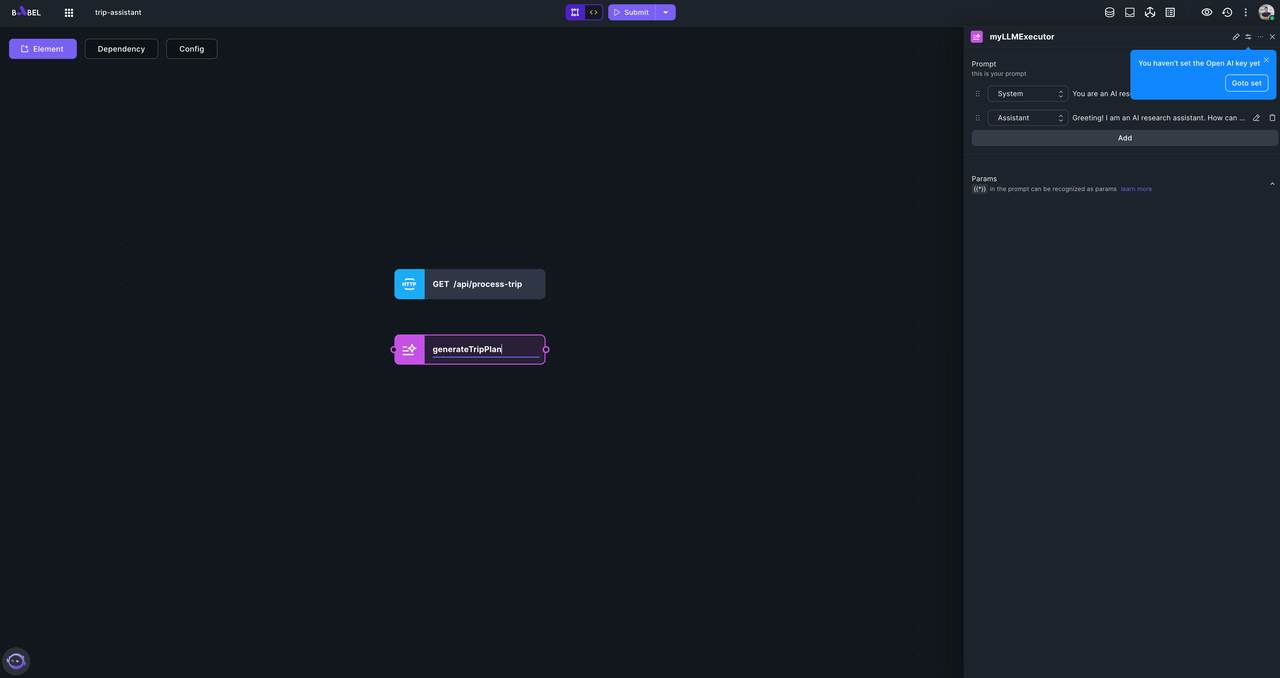
Add a LLMExecutor element, generateTripPlan
-
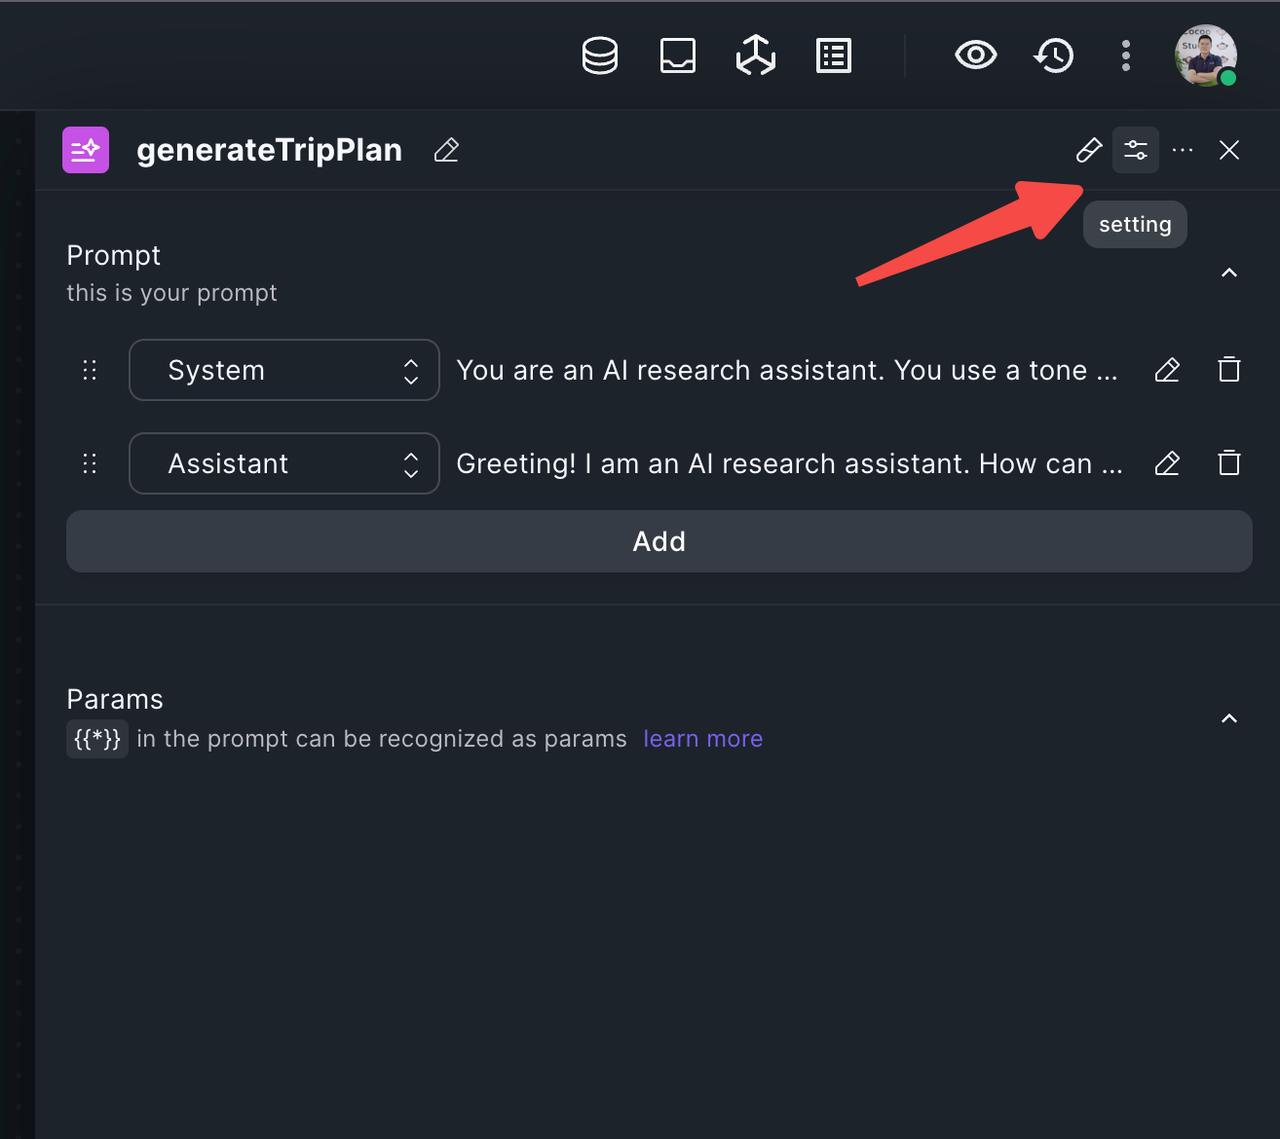
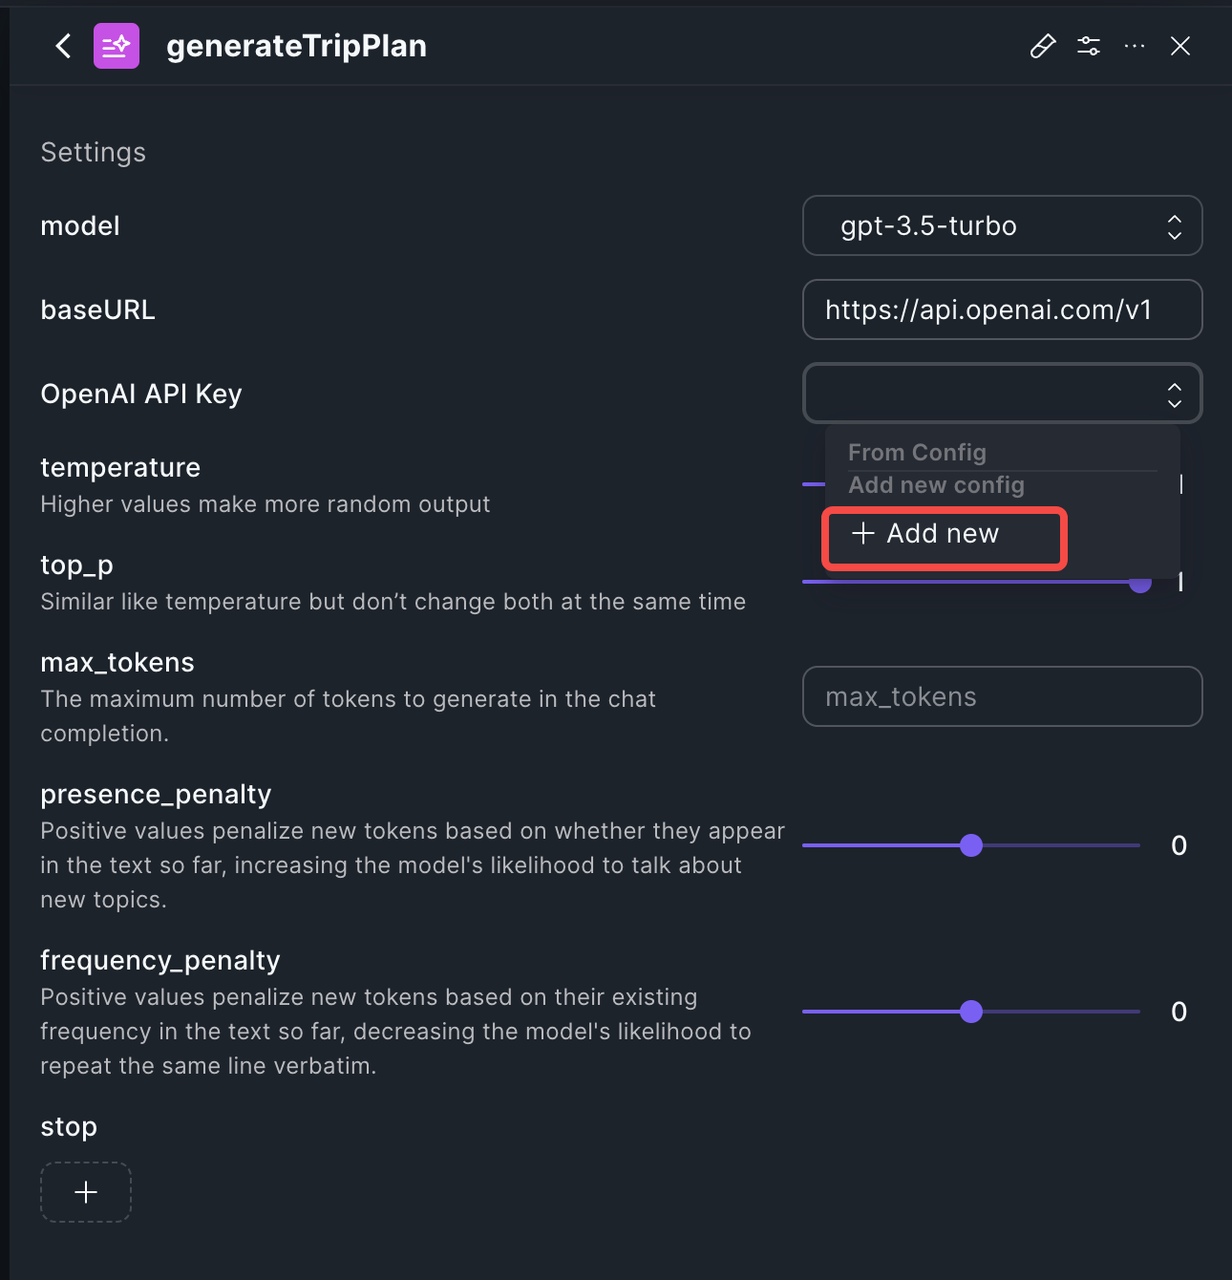
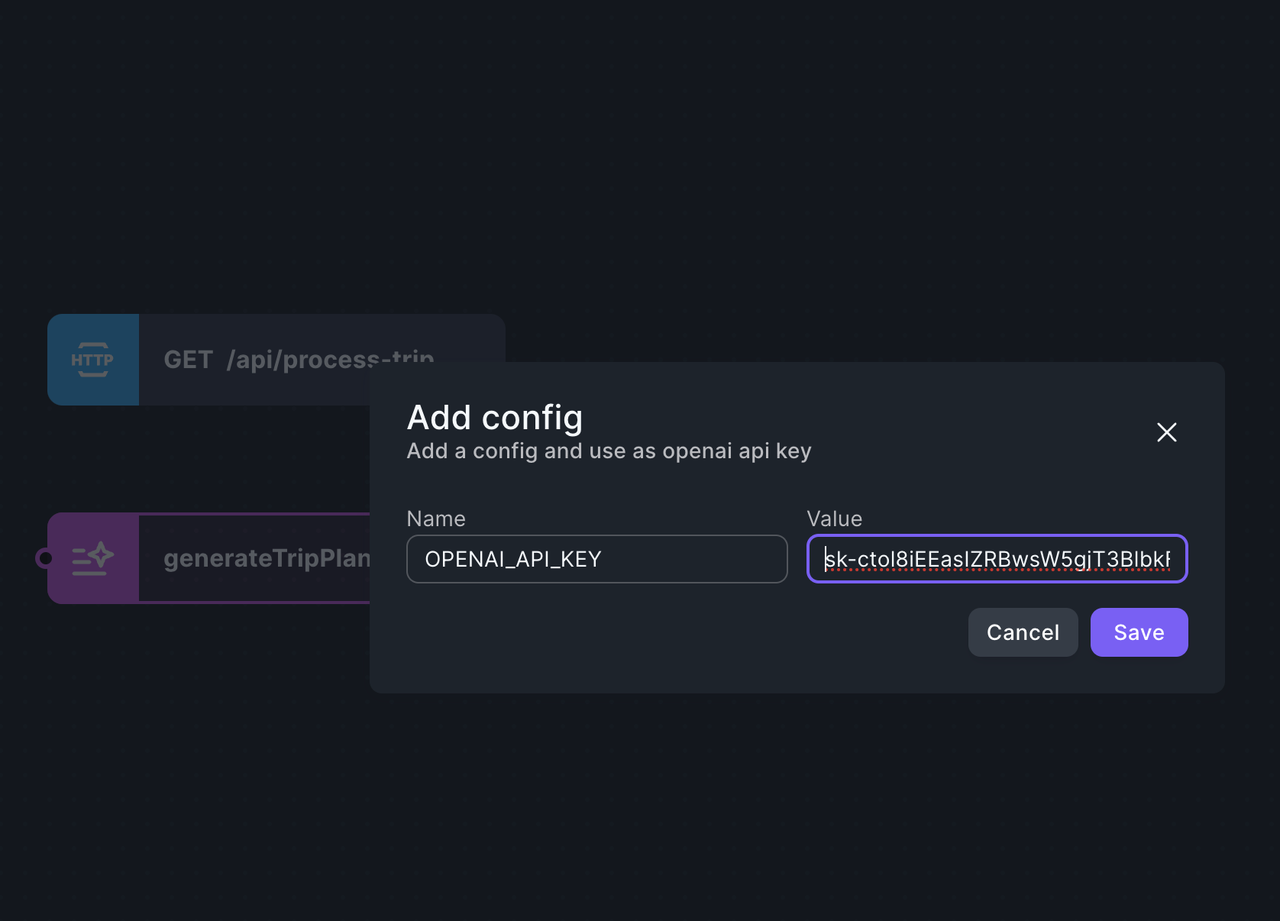
Setup OpenAI Key. If you don't have an OpenAI key, you can use built-in provider. But keep in mind that built-in provider is for testing purpose only.
-
Setup Prompt
Delete the default Assistant prompt and change the System prompt.
You are an AI trip planner. Please give a {{days}} days plan to {{city}}. The client is specially interested in {{interests}}, with special_requirements:
{{special_requirements}}
Use markdown as the output format. You should include pictures if possible. You can use the following format to generate pictures.
. Please note that the picture_description is for an AI to understand and generate the required picture. So you should make sure the picture_description is clear and detailed enough.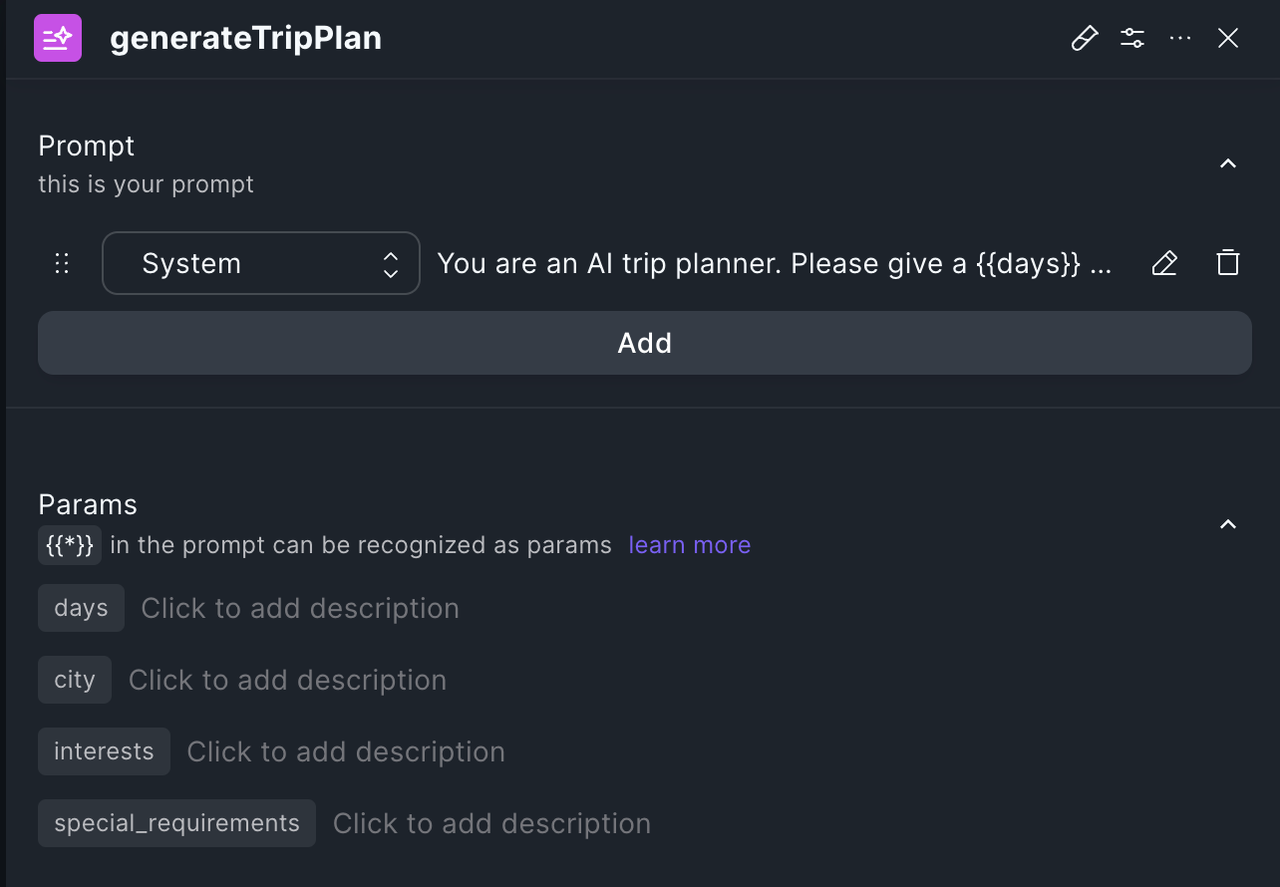
-
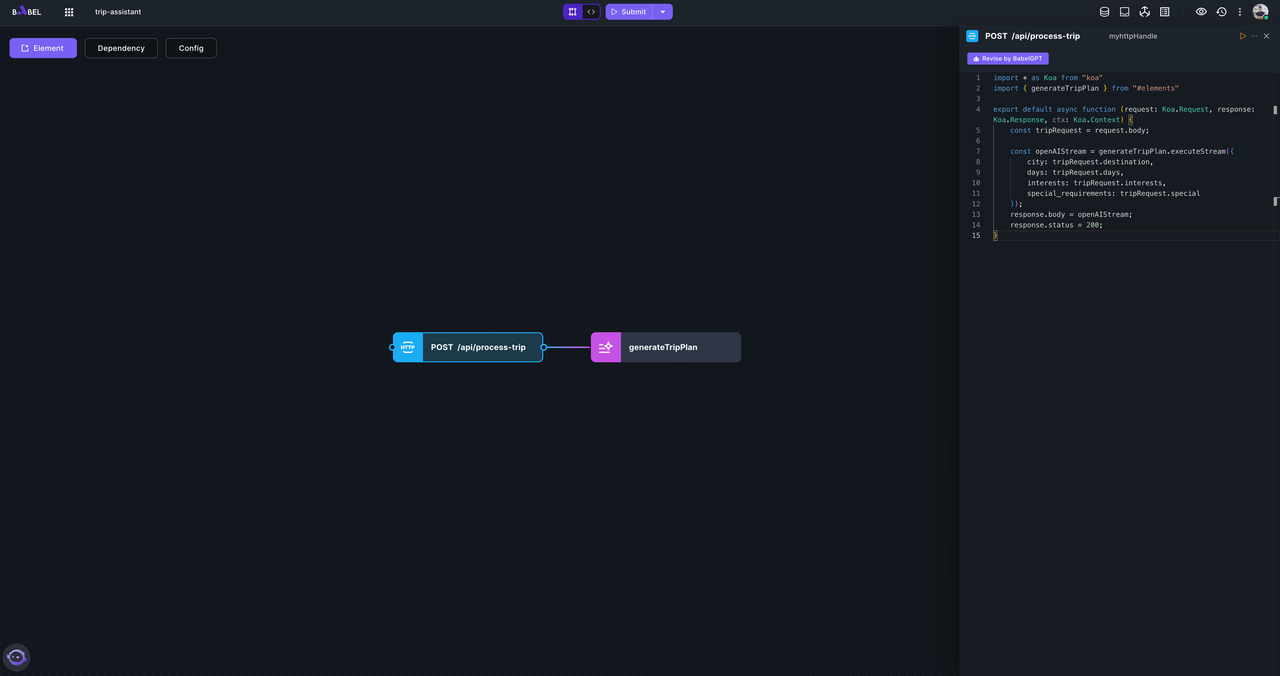
Edit the HTTP element
import * as Koa from "koa";
import { generateTripPlan } from "#elements";

export default async function (
  request: Koa.Request,
  response: Koa.Response,
  ctx: Koa.Context
) {
  const tripRequest = request.body;

  const openAIStream = generateTripPlan.executeStream({
    city: tripRequest.destination,
    days: tripRequest.days,
    interests: tripRequest.interests,
    special_requirements: tripRequest.special,
  });
  response.body = openAIStream;
  response.status = 200;
}
-
Add Assets Element to host the frontend webpage
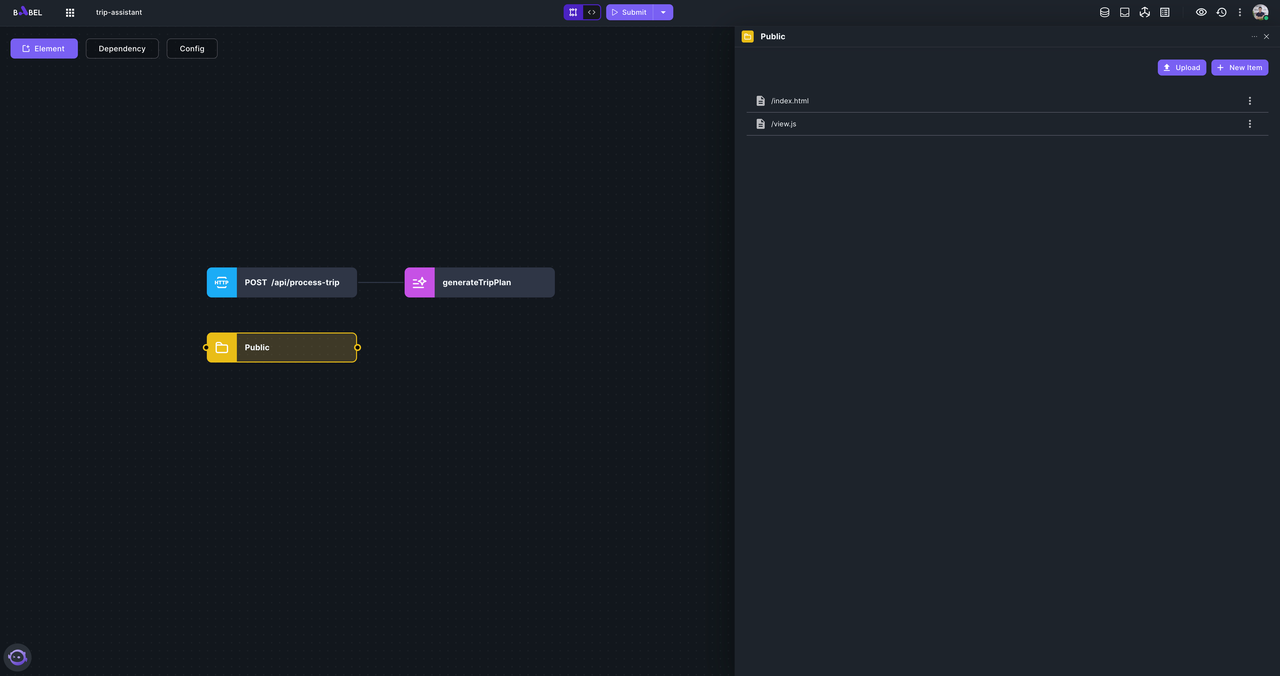
The name of the Assets element has to be "Public". As if an Assets element name is "Public", its items can be accessed directly through URL. Add two items to the assets "index.html" and "view.js".
<!DOCTYPE html>
<html lang="en">

<head>
    <title>Trip Planner</title>
    <meta charset="utf-8" />
    <meta name="viewport" content="initial-scale=1, width=device-width" />
    <script src="https://unpkg.com/react@latest/umd/react.development.js" crossorigin="anonymous"></script>
    <script src="https://unpkg.com/react-dom@latest/umd/react-dom.development.js"></script>
    <script src="https://unpkg.com/@mui/material@latest/umd/material-ui.development.js" crossorigin="anonymous">
    </script>
    <script src="https://unpkg.com/@babel/standalone@latest/babel.min.js" crossorigin="anonymous"></script>
    <script src="https://cdnjs.cloudflare.com/ajax/libs/markdown-it/12.2.0/markdown-it.min.js"></script>
    <!-- Fonts to support Material Design -->
    <link rel="preconnect" href="https://fonts.googleapis.com" />
    <link rel="preconnect" href="https://fonts.gstatic.com" crossorigin />
    <link rel="stylesheet"
        href="https://fonts.googleapis.com/css2?family=Roboto:wght@300;400;500;600;700&display=swap" />
    <!-- Icons to support Material Design -->
    <link rel="stylesheet" href="https://fonts.googleapis.com/icon?family=Material+Icons" />
</head>

<body>
    <div id="root"></div>
    <script type="text/babel" src="view.js">

    </script>
</body>

</html>
const {
colors,
CssBaseline,
ThemeProvider,
Typography,
Container,
createTheme,
Box,
SvgIcon,
Link,
Icon,
Card,
CardContent,
} = MaterialUI;
// Create a theme instance.
const theme = createTheme({
palette: {
primary: {
main: "#556cd6",
},
secondary: {
main: "#19857b",
},
error: {
main: colors.red.A400,
},
},
});
const hot5Citys = [
{
name: "Paris",
color: "#ce93d8",
},
{
name: "Tokyo",
color: "#f06292",
},
{
name: "Rome",
color: "#7986cb",
},
{
name: "New York City",
color: "#4db6ac",
},
{
name: "Barcelona",
color: "#ffb74d",
},
];
function App() {
const [form, setForm] = React.useState({
destination: hot5Citys[0].name,
days: 5,
interests: ["Food"],
special: "",
});
const [result, setResult] = React.useState(null);
const [loading, setLoading] = React.useState(false)
const handleCheckboxChange = (value) => () => {
if (form.interests.includes(value)) {
setForm({
...form,
interests: form.interests.filter((val) => val !== value),
});
} else {
setForm({
...form,
interests: [...form.interests, value],
});
}
};
return (
<Container style={{ maxWidth: "900px", marginTop: "30px" }}>
<Card>
<CardContent>
<Typography variant="h4" component="h1" gutterBottom>
Trip Planner
</Typography>
<Box sx={{ my: 4 }}>
{/* Input */}
<Box style={{ marginTop: "10px" }}>
<MaterialUI.TextField
required
disabled={loading}
value={form.destination}
onChange={(e) => {
setForm({
...form,
destination: e.target.value,
});
}}
size="small"
label="Destination"
variant="outlined"
/>
<Box style={{ marginTop: "4px" }}>
<span style={{ marginRight: "4px", fontWeight: "900" }}>
Hot 5:
</span>
{hot5Citys.map((city) => {
return (
<MaterialUI.Chip
disabled={loading}
size="small"
onClick={() => {
setForm({
...form,
destination: city.name,
});
}}
variant="contained"
style={{
cursor: "pointer",
margin: "5px",
backgroundColor: city.color,
color: "white",
}}
label={city.name}
key={city.name}
></MaterialUI.Chip>
);
})}
</Box>
</Box>
{/* Number Input */}
<Box style={{ marginTop: "10px" }}>
<MaterialUI.TextField
disabled={loading}
label="Days to stay"
type="number"
size="small"
value={form.days}
onChange={(e) => {
setForm({
...form,
days: e.target.value,
});
}}
InputLabelProps={{
shrink: true,
}}
variant="outlined"
/>
</Box>
<Box style={{ marginTop: "10px" }}>
<MaterialUI.FormLabel component="legend">
{'Interests In'}
</MaterialUI.FormLabel>
<MaterialUI.FormGroup>
{[
"Culture",
"Food",
"Art",
"Shopping",
"History",
"Scenery",
"Play",
].map((item) => {
return (
<MaterialUI.FormControlLabel
key={item}
control={
<MaterialUI.Checkbox
disabled={loading}
size="small"
onChange={handleCheckboxChange(item)}
checked={form.interests.includes(item)}
name={item}
/>
}
label={item}
/>
);
})}
</MaterialUI.FormGroup>
</Box>
<Box style={{ marginTop: "10px" }}>
<MaterialUI.Input
disabled={loading}
value={form.special}
onChange={(e) => {
setForm({
...form,
special: e.target.value,
});
}}
multiline
minRows={3}
placeholder="Special requirements"
style={{
width: "500px",
border: "1px solid rgba(0,0,0,0.87)",
borderRadius: "4px",
padding: "5px",
}}
/>
</Box>
</Box>
<Box>
<MaterialUI.Button
startIcon={
loading && (
<MaterialUI.CircularProgress style={{ width: "20px", height: "20px" }}></MaterialUI.CircularProgress>
)
}
variant="contained"
disabled={loading}
onClick={() => {
let responseValue = "";
const md = window.markdownit();
console.info(form);
setLoading(true)
fetch("/api/process-trip", {
method: "POST",
headers: {
"Content-Type": "application/json",
},
body: JSON.stringify(form, null, 2),
}).then((response) => {
const reader = response.body.getReader();
reader.read().then(function processText({ done, value }) {
if (done) {
console.log("Stream complete");
return;
}
const chunk = new TextDecoder("utf-8").decode(value);
responseValue += chunk;
const result = md.render(responseValue);
setResult(result);
return reader.read().then(processText);
}).finally(() => {
setLoading(false)
console.info("finally")
});
})
}}
>
{"Start !"}
</MaterialUI.Button>
</Box>
</CardContent>
</Card>
{result && (
<MaterialUI.Card
style={{ marginTop: "30px", padding: "10px" }}
dangerouslySetInnerHTML={{ __html: result }}
></MaterialUI.Card>
)}
</Container>
);
}
const root = ReactDOM.createRoot(document.getElementById("root"));
root.render(
<ThemeProvider theme={theme}>
{/* CssBaseline kickstart an elegant, consistent, and simple baseline to build upon. */}
<CssBaseline />
<App />
</ThemeProvider>
);Please note that you can use any frontend technology such as React, Vue, to build webpages as long as it is compiled into static files such as .html, .css, .js. You can also host your frontend somewhere else and call the API hosted in Babel.
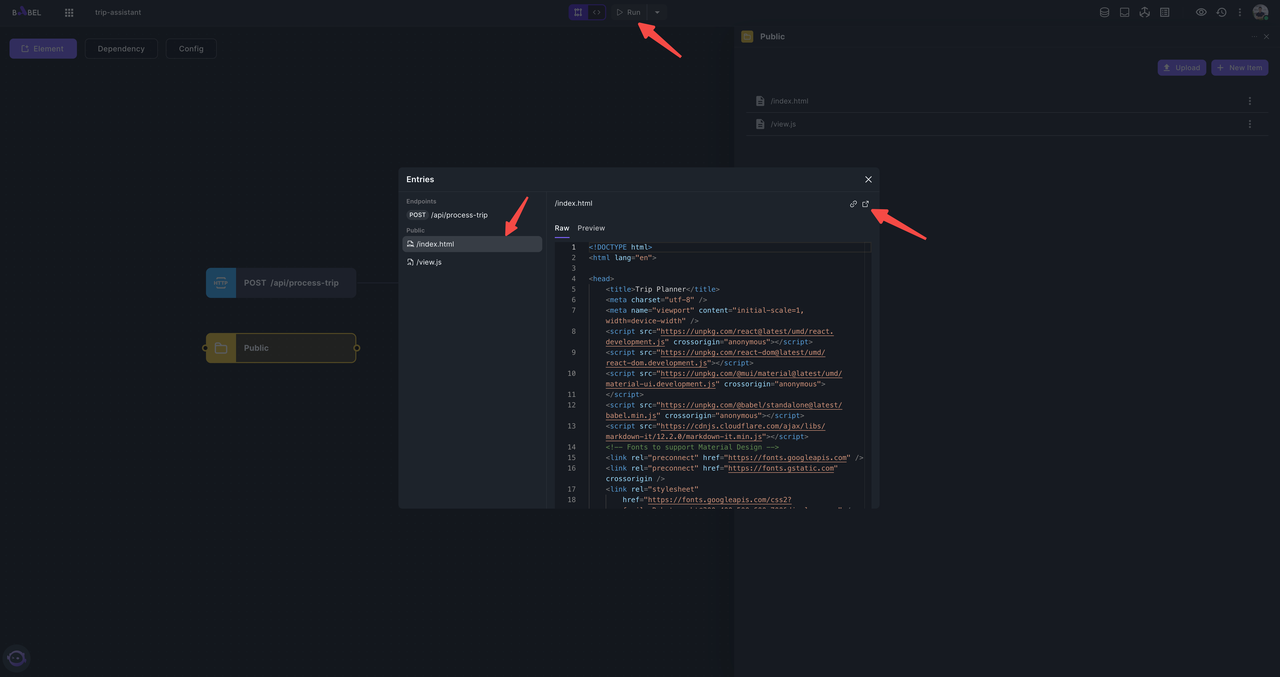
-
Click "Submit" on top of the workspace.z
If the submission is successful, the "Submit" button will change to "Run" button.
-
Click "Run", select index.html and click the "Open in new tab" icon
You should see a webpage like this
-
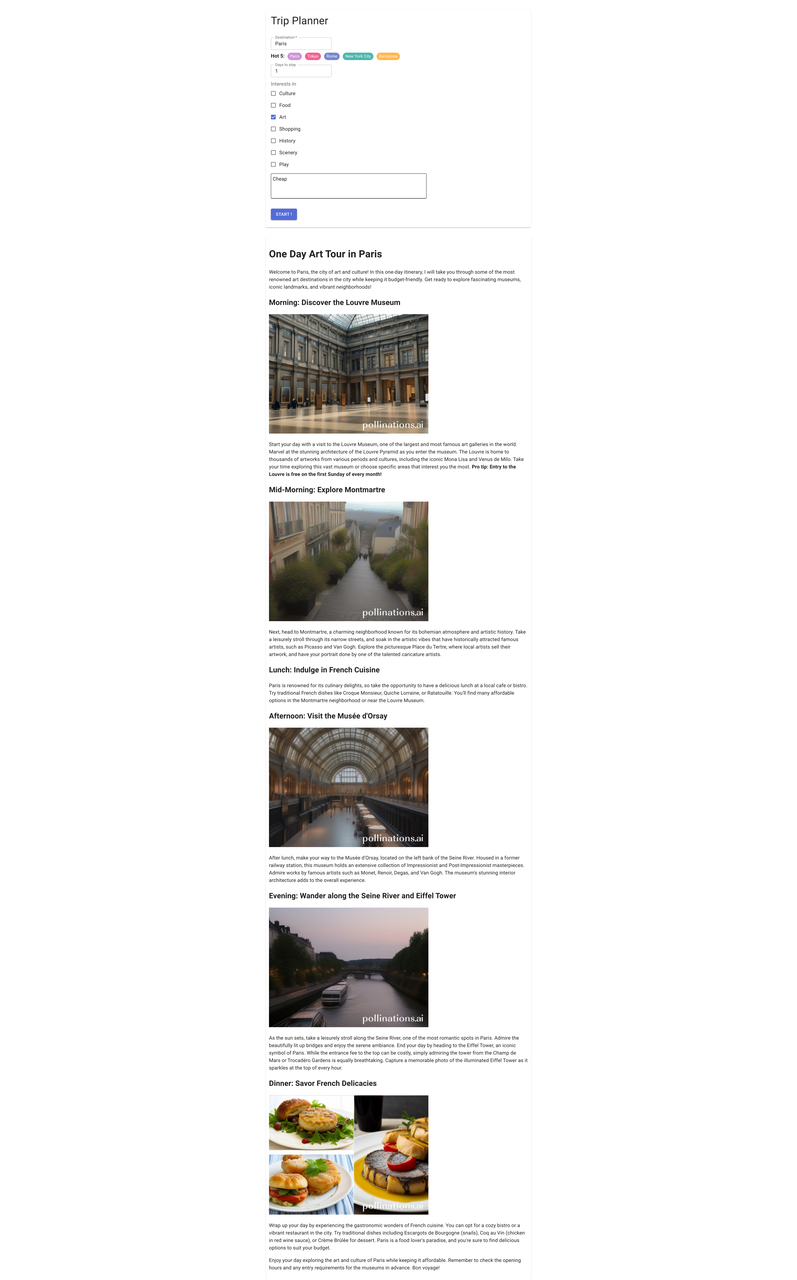
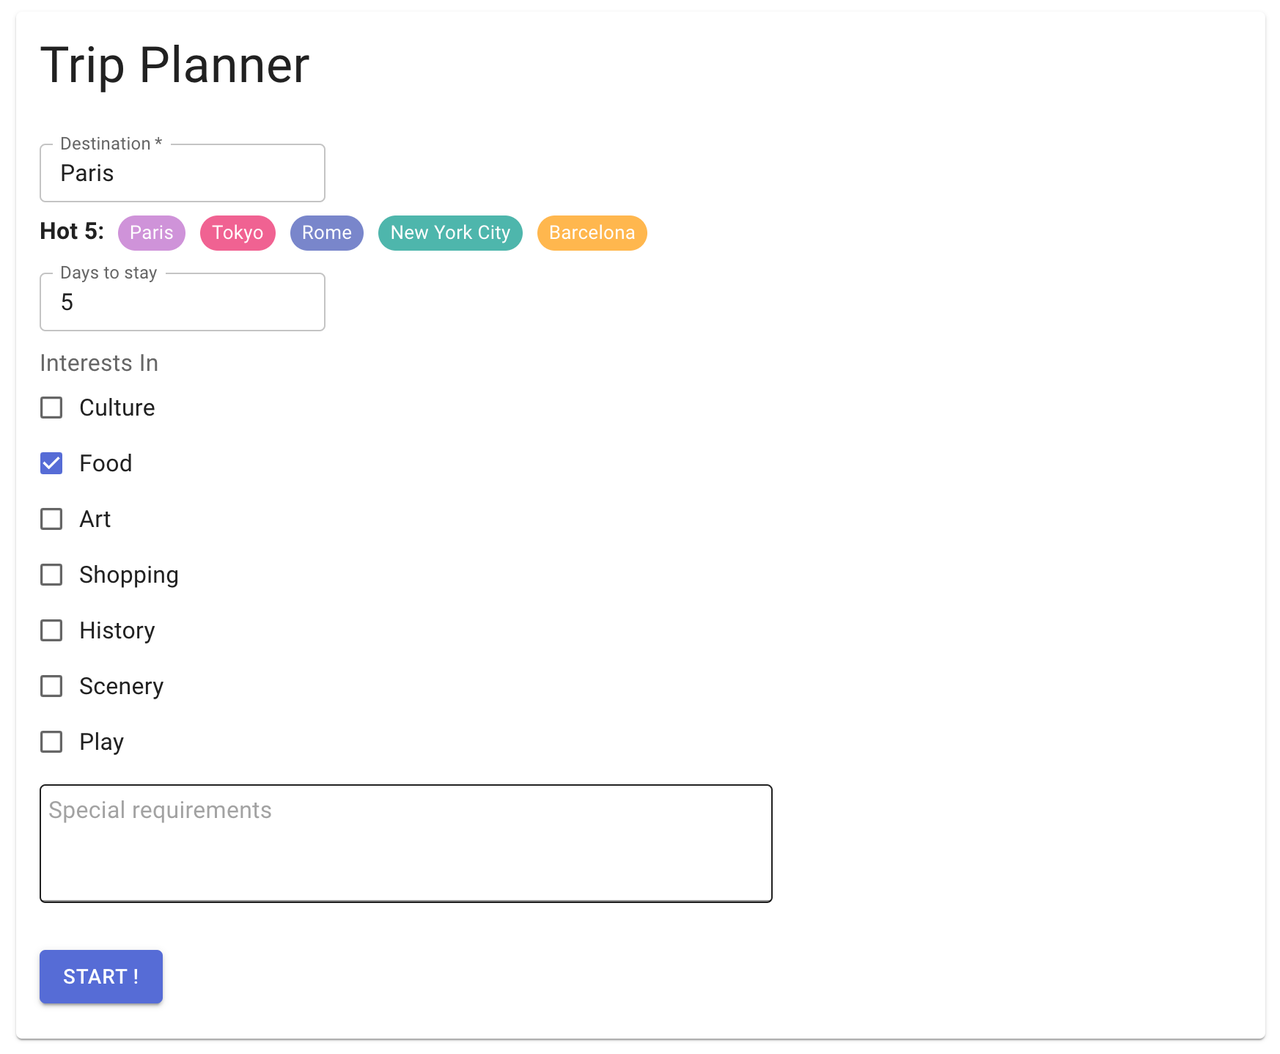
Get your trip plan
Input anything in the form as you like and click "START!", you should see a result like this: