Build a User Management App
This tutorial demonstrates how to build a traditional user management feature with Database element, HTTP element, Function element and Assets element as frontend.
Requirements
- User can register an account through a webpage.
- Account profile should include email, name, password and avatar.
- User can login with email and password.
- User can update profile.
Analysis
This requirement is a typical user account feature. We need three webpages: register, login, profile. And we need corresponding backend APIs. The account info will be saved in database, and the avatar picture will be stored in storage.
Building the App
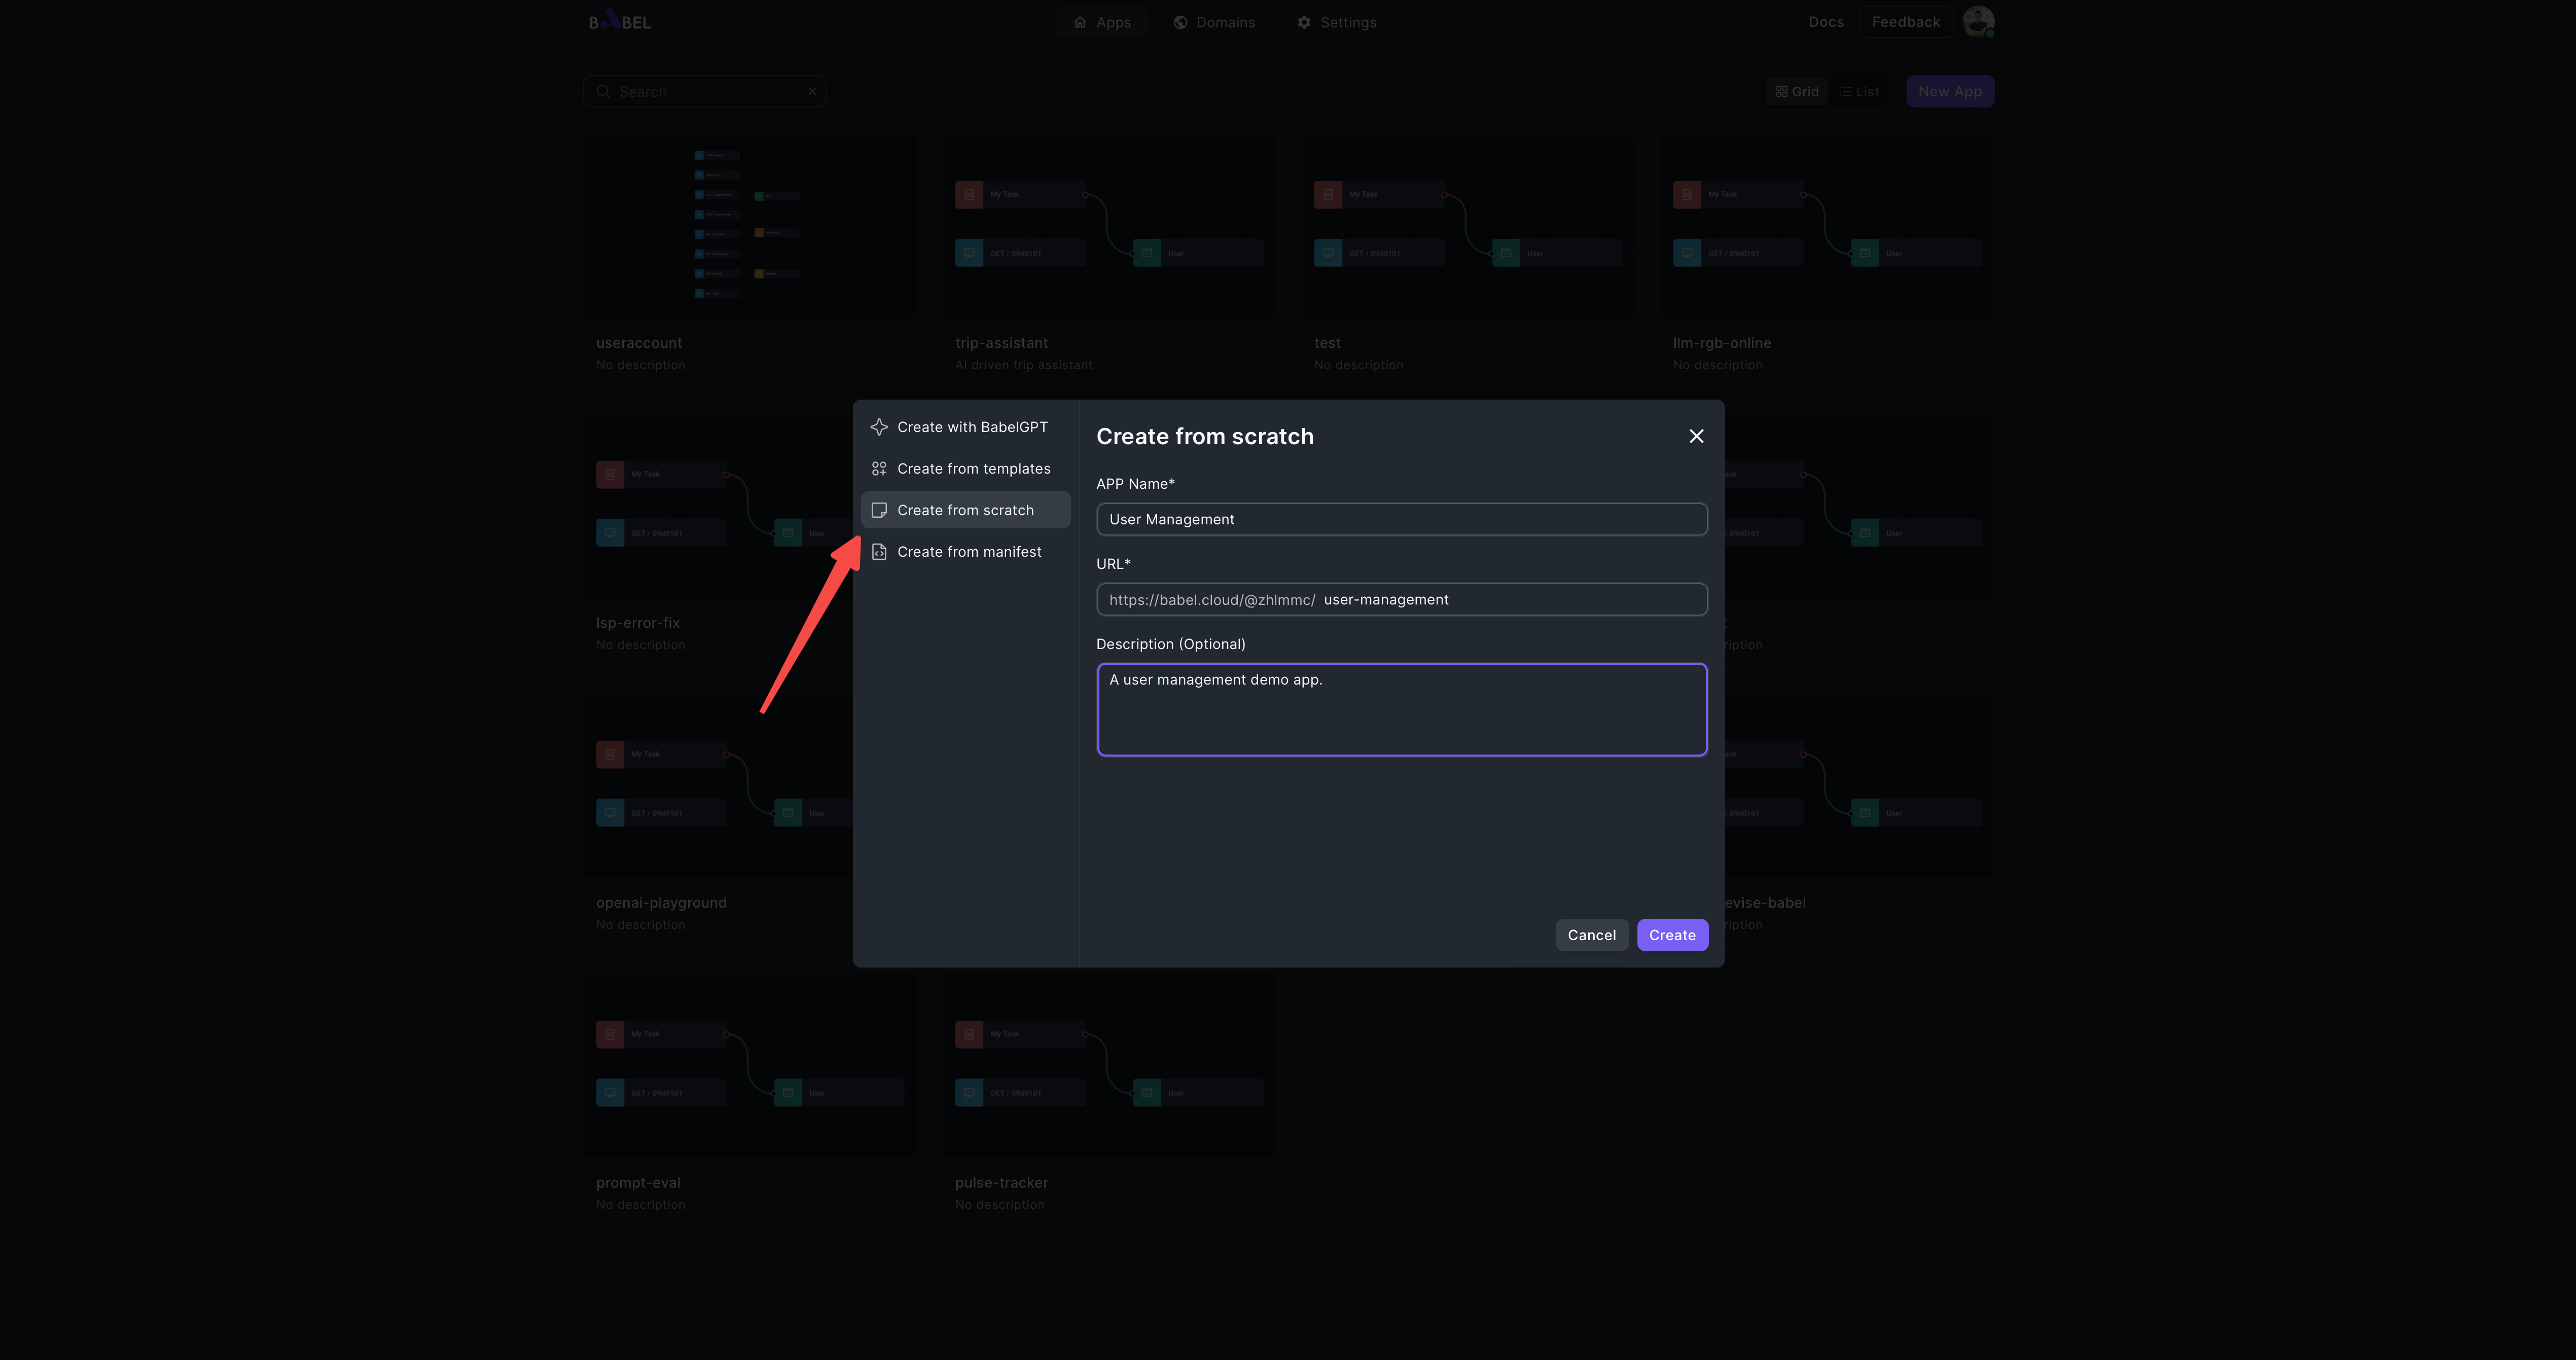
-
Create a new Babel application from scratch
-
Add a Database element and add required fields
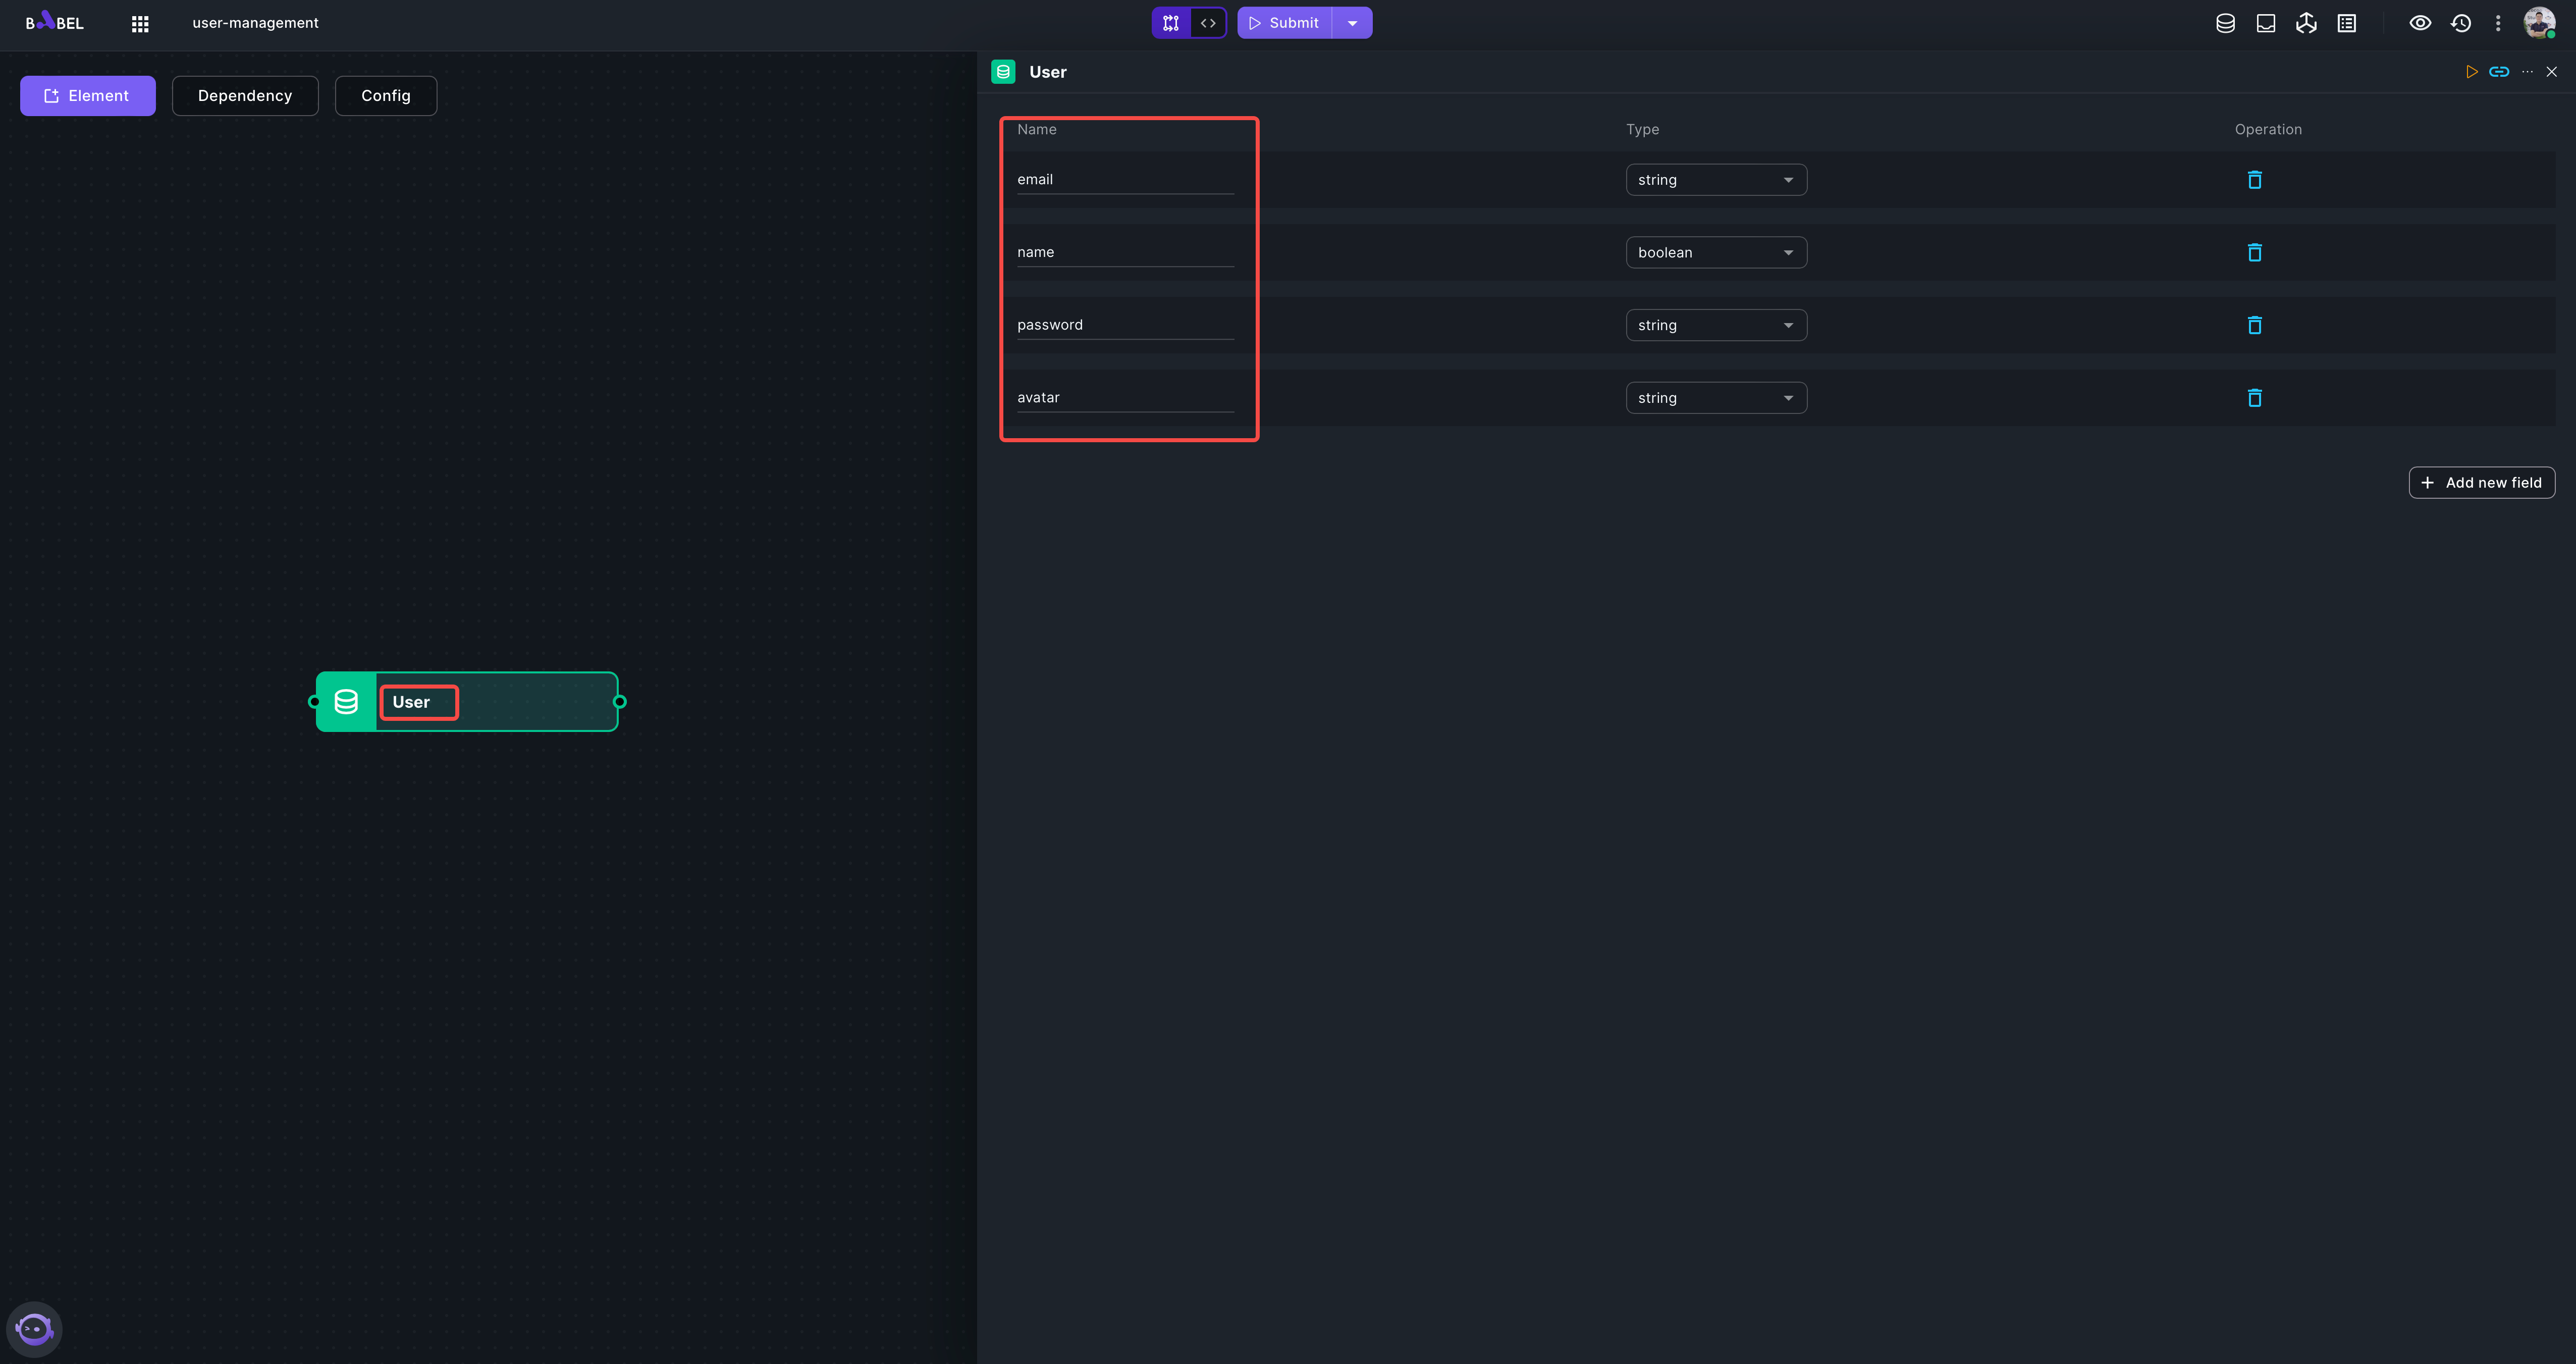
The database name "User" and four fields "email, name, password, avatar", all in string.
-
Add a Storage element "AvatarStorage"
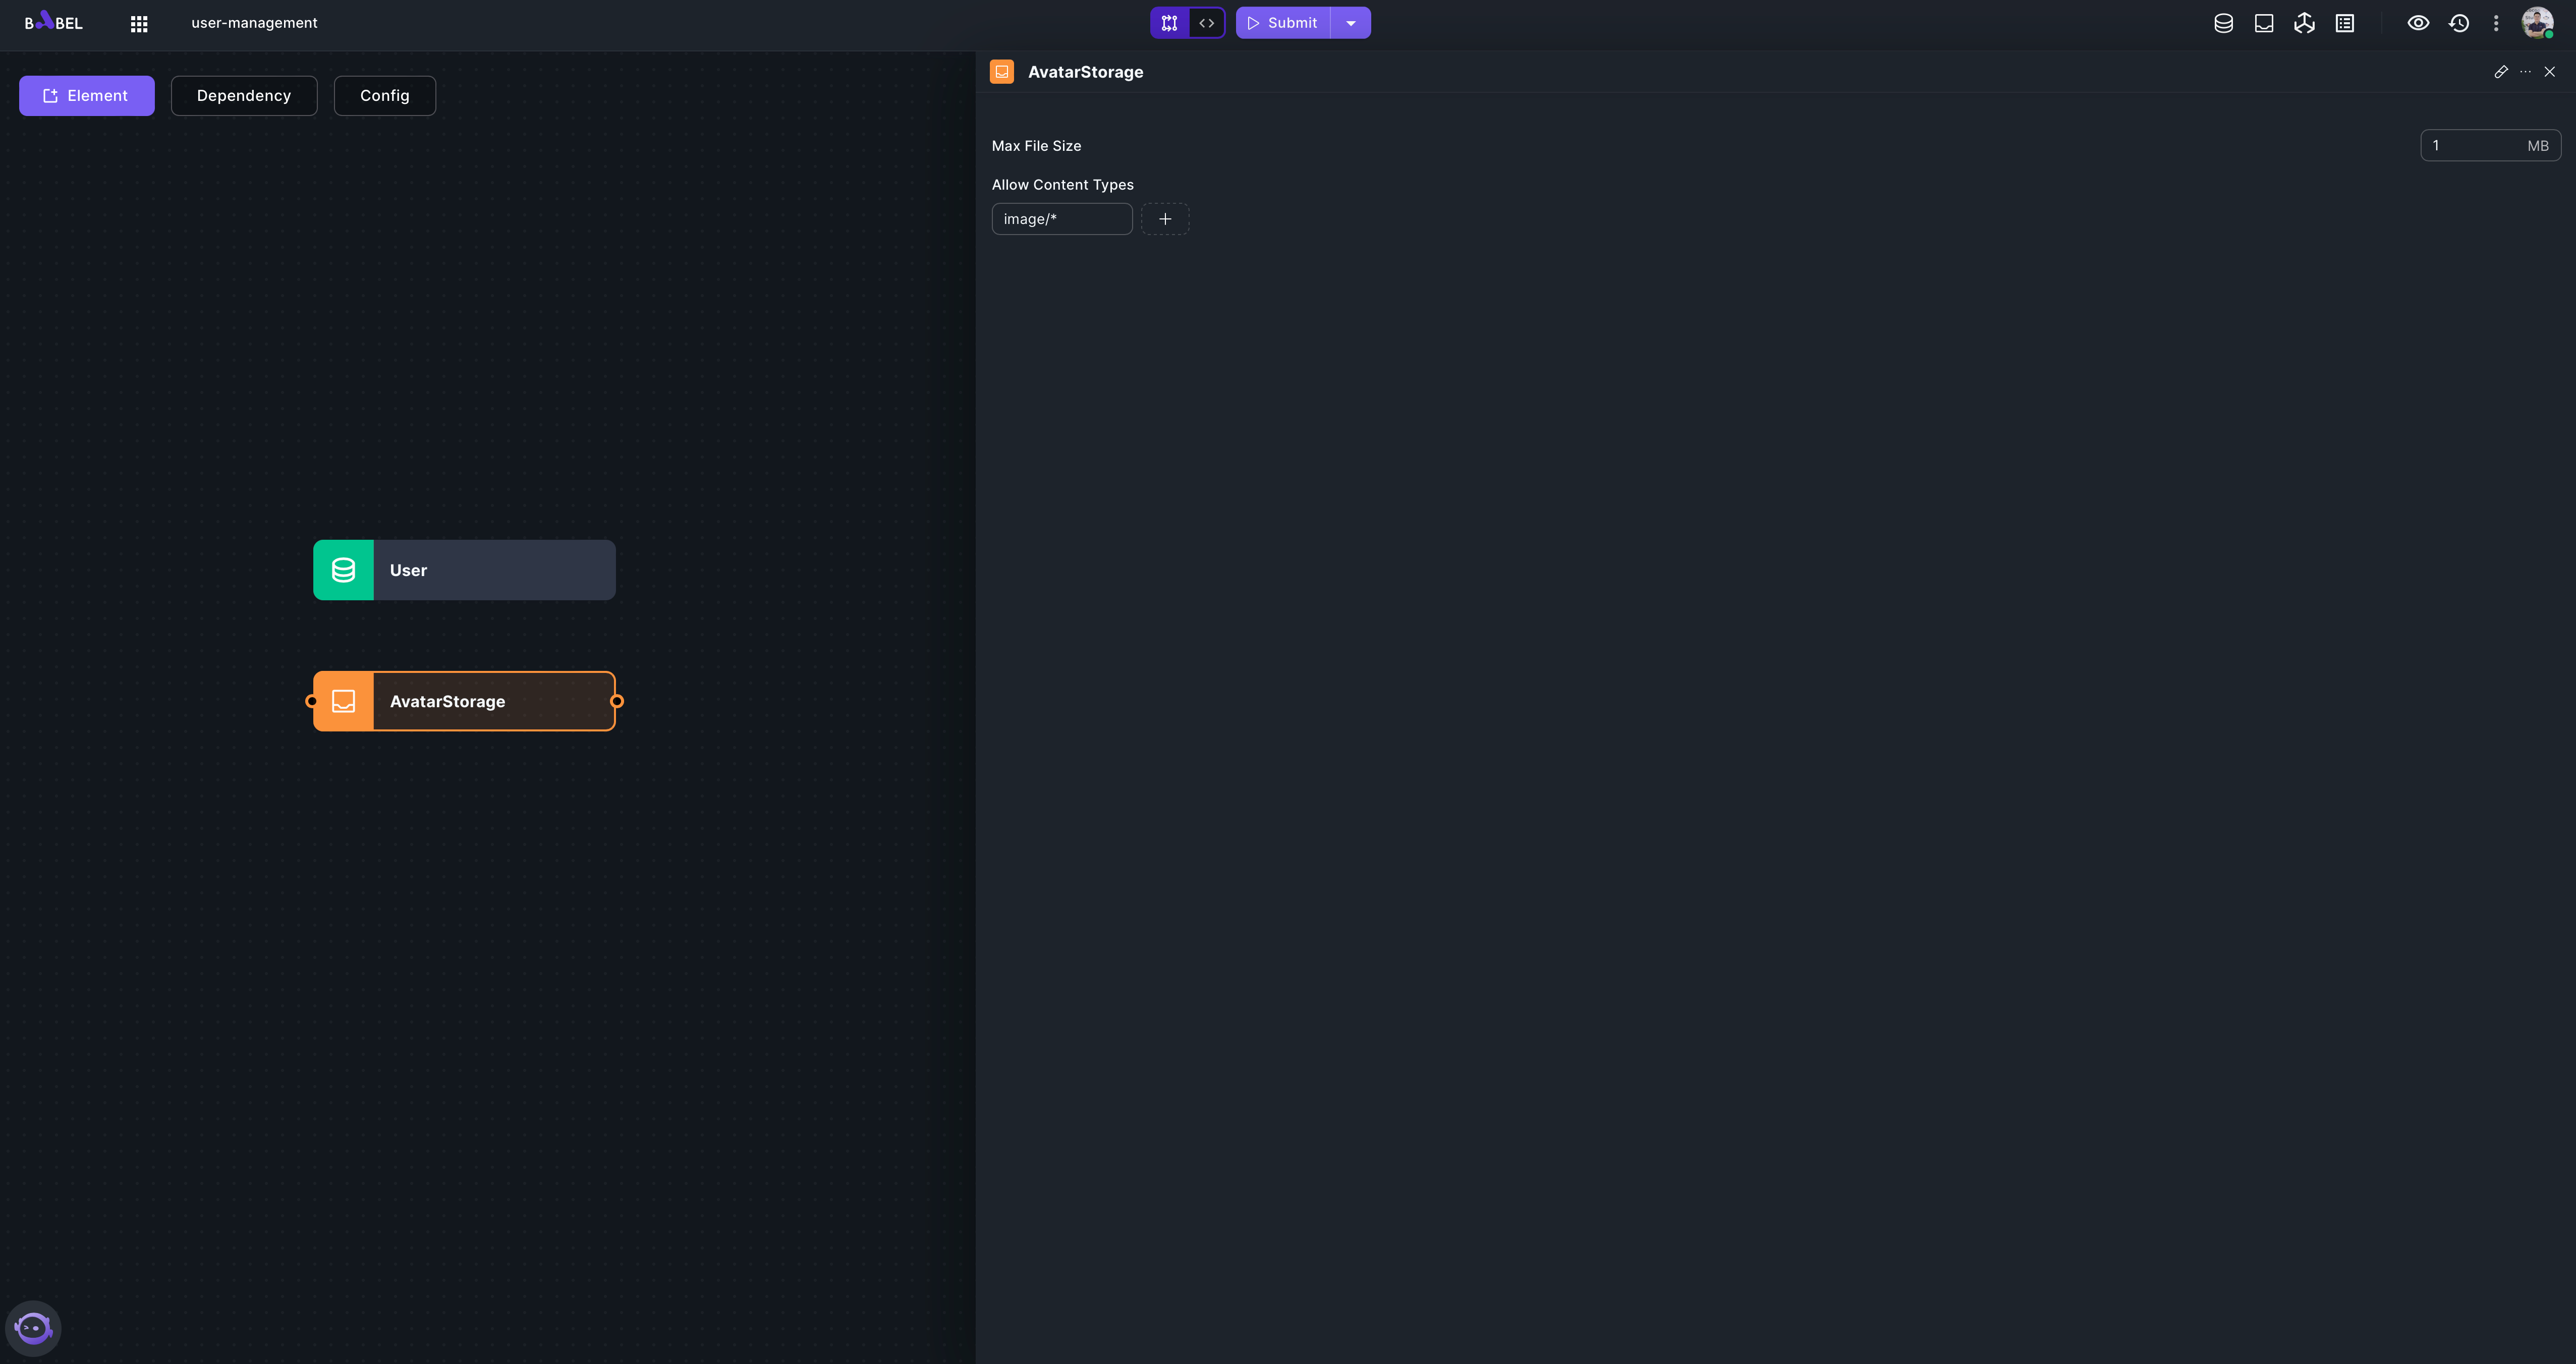
Set the content type "image/*", and set max file size 1MB.
-
Add an Assets element "frontend" as frontend
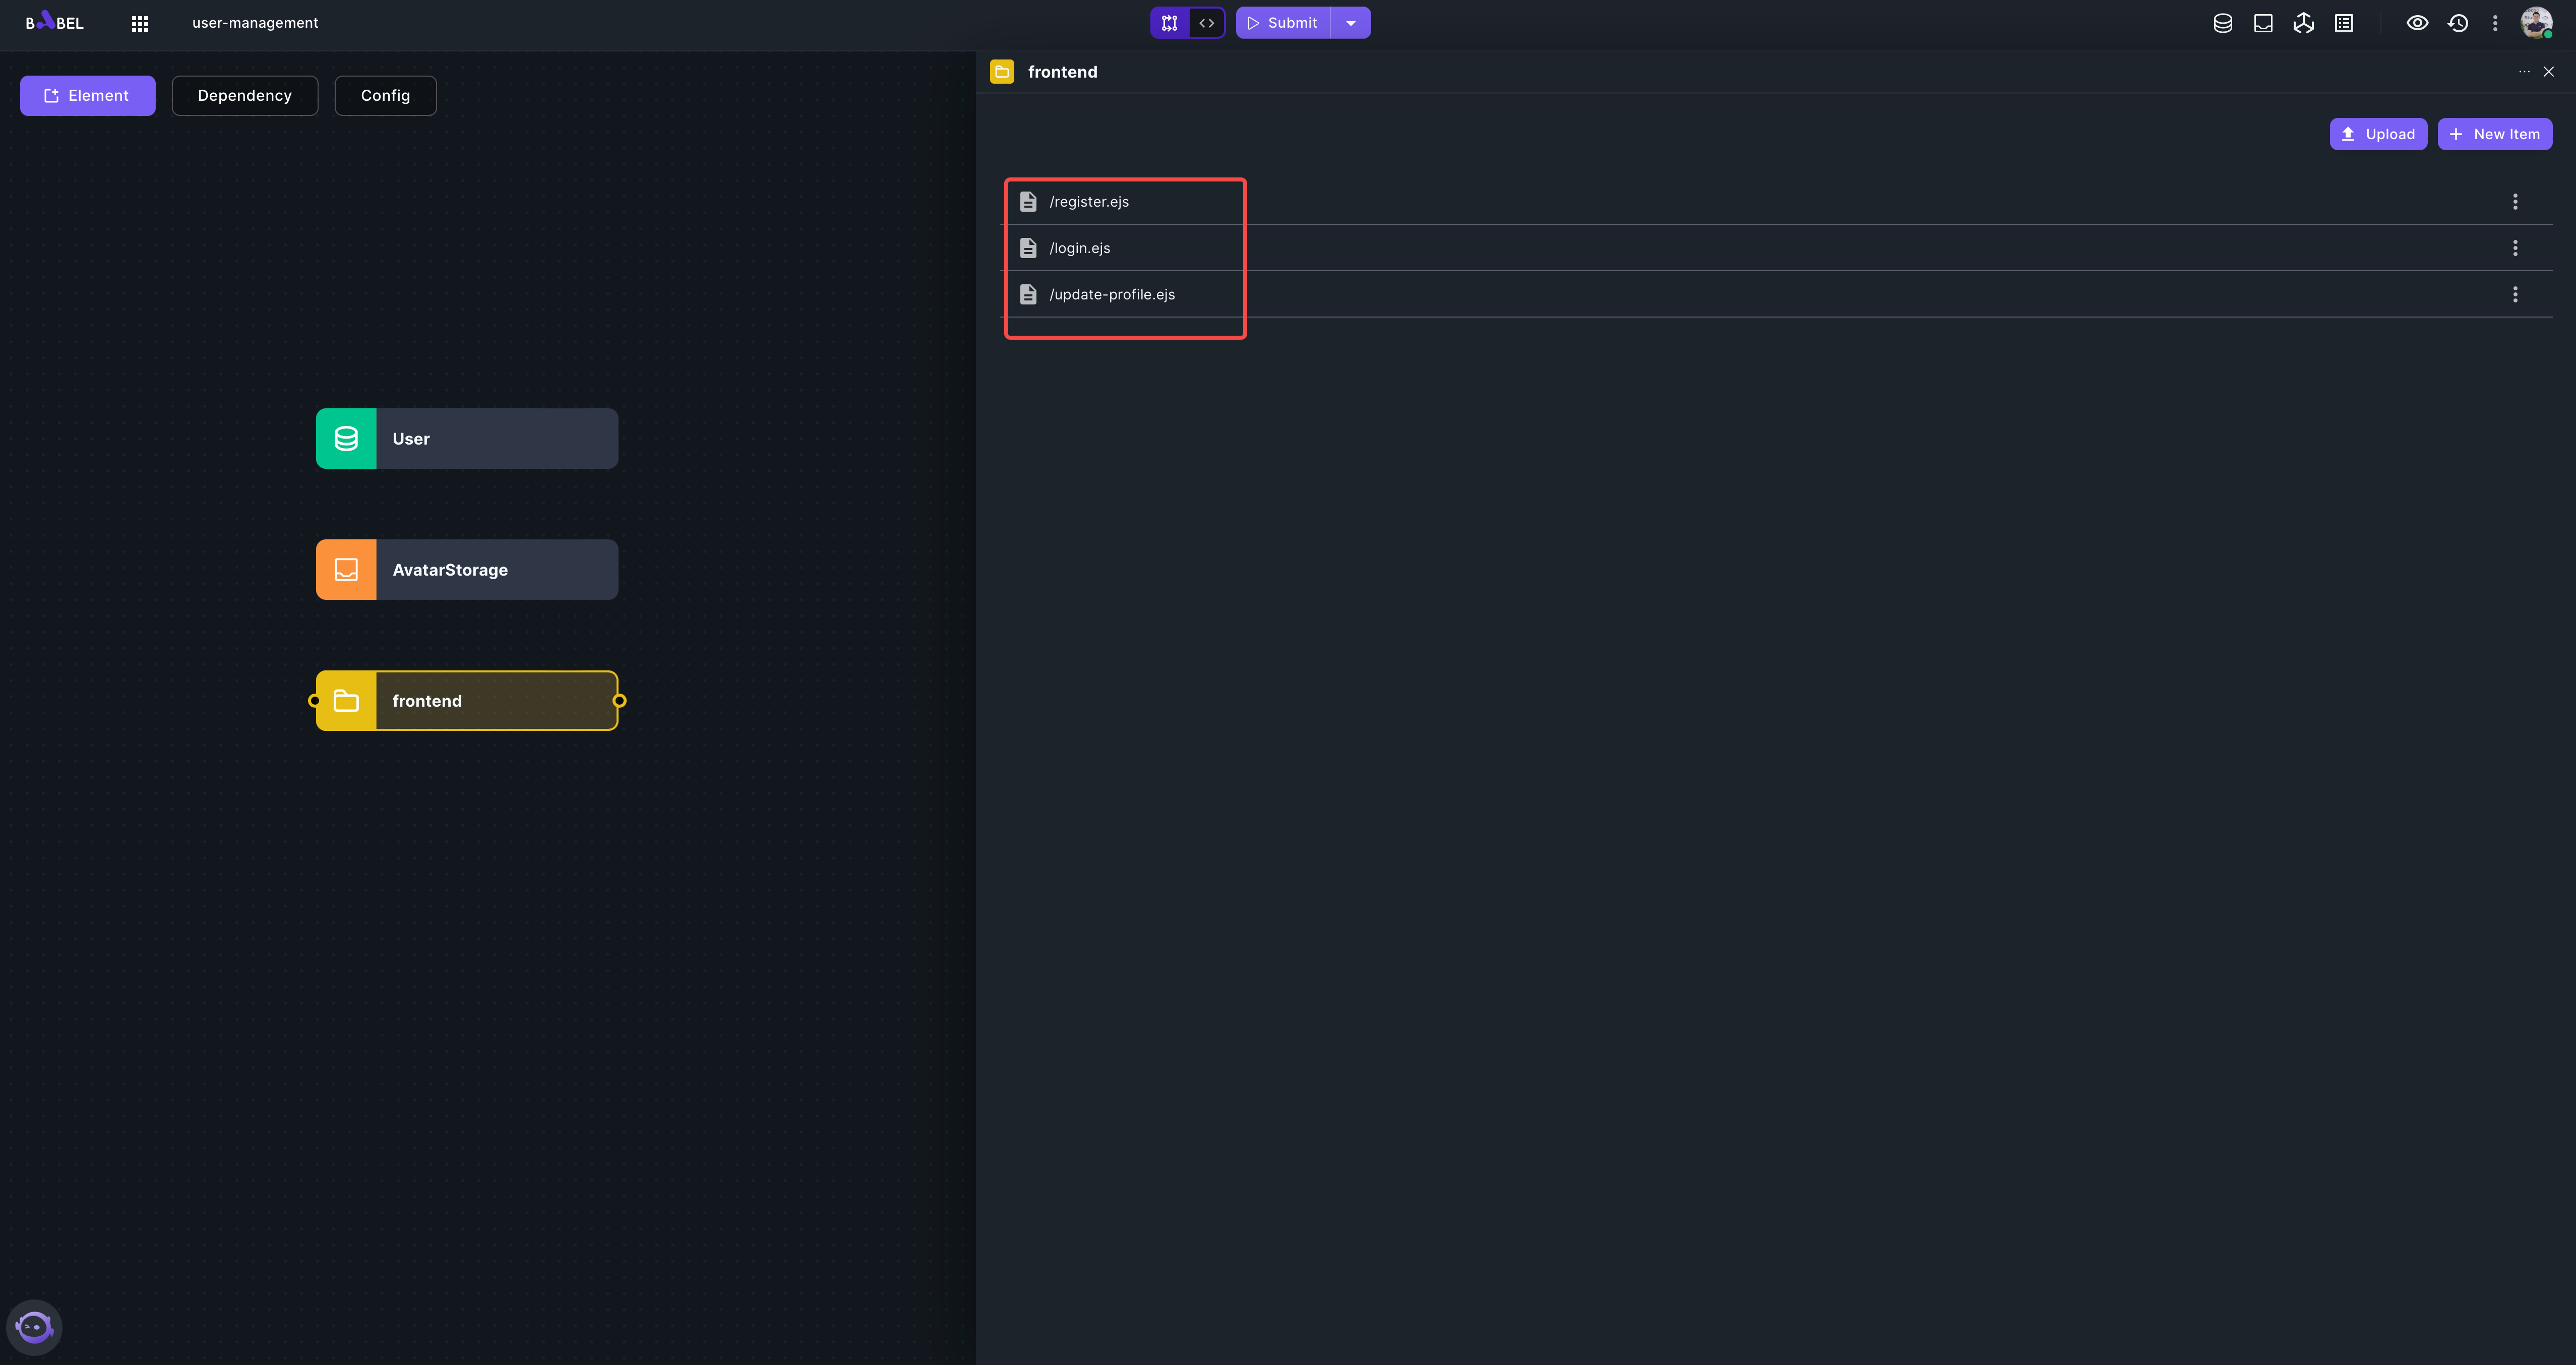
Add three items to the Assets element "/register.ejs", "/login.ejs", "/update-profile". We use ejs to render pages in this app. Here are the contents for each page:
<!DOCTYPE html>
<html>
<head>
    <title>Register</title>
    <style>
        body {
            font-family: Arial, sans-serif;
            margin: 0;
            padding: 0;
            background-color: #f0f0f0;
        }
        .container {
            width: 100%;
            max-width: 600px;
            margin: 0 auto;
            padding: 20px;
        }
        form {
            background-color: #fff;
            border: 1px solid #ddd;
            padding: 20px;
            border-radius: 5px;
        }
        input[type="text"], input[type="email"], input[type="password"] {
            width: 100%;
            padding: 10px;
            margin-bottom: 10px;
            border: 1px solid #ddd;
            border-radius: 5px;
        }
        input[type="submit"] {
            padding: 10px 20px;
            border: none;
            border-radius: 5px;
            background-color: #007BFF;
            color: #fff;
            cursor: pointer;
        }
        input[type="submit"]:hover {
            background-color: #0056b3;
        }
    </style>
</head>
<body>
    <div class="container">
        <h1>Register</h1>
        <form action="/register" method="post">
            <label for="email">Email:</label><br>
            <input type="email" id="email" name="email"><br>
            <label for="name">Name:</label><br>
            <input type="text" id="name" name="name"><br>
            <label for="password">Password:</label><br>
            <input type="password" id="password" name="password"><br>
            <input type="submit" value="Submit">
        </form>
    </div>
</body>
</html><!DOCTYPE html>
<html>
<head>
<title>Login</title>
<style>
body {
font-family: Arial, sans-serif;
margin: 0;
padding: 0;
background-color: #f4f4f4;
}
.container {
width: 80%;
margin: auto;
overflow: hidden;
}
#login-form {
margin: 30px auto;
padding: 30px;
background: #fff;
border-radius: 5px;
box-shadow: 0px 0px 10px #aaa;
width: 50%;
}
#login-form label {
display: block;
margin: 10px 0;
}
#login-form input[type="email"],
#login-form input[type="password"] {
width: 100%;
padding: 10px;
border: 1px solid #ddd;
border-radius: 5px;
}
#login-form input[type="submit"] {
display: block;
width: 100%;
padding: 10px;
border: none;
border-radius: 5px;
color: #fff;
background: #333;
cursor: pointer;
}
#login-form input[type="submit"]:hover {
background: #444;
}
</style>
</head>
<body>
<div class="container">
<form id="login-form" action="/login" method="post">
<label for="email">Email:</label>
<input type="email" id="email" name="email">
<label for="password">Password:</label>
<input type="password" id="password" name="password">
<input type="submit" value="Submit">
</form>
</div>
</body>
</html><!DOCTYPE html>
<html>
<head>
<title>Update Profile</title>
<style>
body {
font-family: Arial, sans-serif;
margin: 0;
padding: 0;
background-color: #f4f4f4;
}
.container {
width: 80%;
margin: auto;
overflow: hidden;
}
.header {
background: #50b3a2;
color: white;
padding: 10px;
text-align: center;
}
.avatar {
display: block;
margin: 20px auto;
width: 100px;
height: 100px;
border-radius: 50%;
}
form {
background: white;
padding: 20px;
margin-bottom: 20px;
}
input[type="text"], input[type="email"], input[type="password"] {
width: 100%;
padding: 10px;
margin-bottom: 10px;
}
input[type="submit"] {
width: 100%;
background: #50b3a2;
color: white;
border: none;
padding: 10px;
margin-top: 20px;
cursor: pointer;
}
input[type="submit"]:hover {
background: #4b6459;
}
</style>
</head>
<body>
<div class="header">
<h1>Update Profile</h1>
</div>
<div class="container">
<img class="avatar" src="/getAvatar?email=<%= user.email %>">
<form action="/upload-avatar" method="post" enctype="multipart/form-data">
<input type="file" id="avatar" name="avatar" accept="image/*">
<input type="email" id="email" name="email" hidden=true value="<%= user.email %>"><br>
<input type="submit" value="Upload Avatar">
</form>
<form action="/update-profile" method="post">
<label for="email">Email:</label><br>
<input type="email" id="email" name="email" value="<%= user.email %>"><br>
<label for="name">Name:</label><br>
<input type="text" id="name" name="name" value="<%= user.name %>"><br>
<label for="password">New Password:</label><br>
<input type="password" id="password" name="password"><br>
<input type="submit" value="Submit">
</form>
</div>
</body>
</html> -
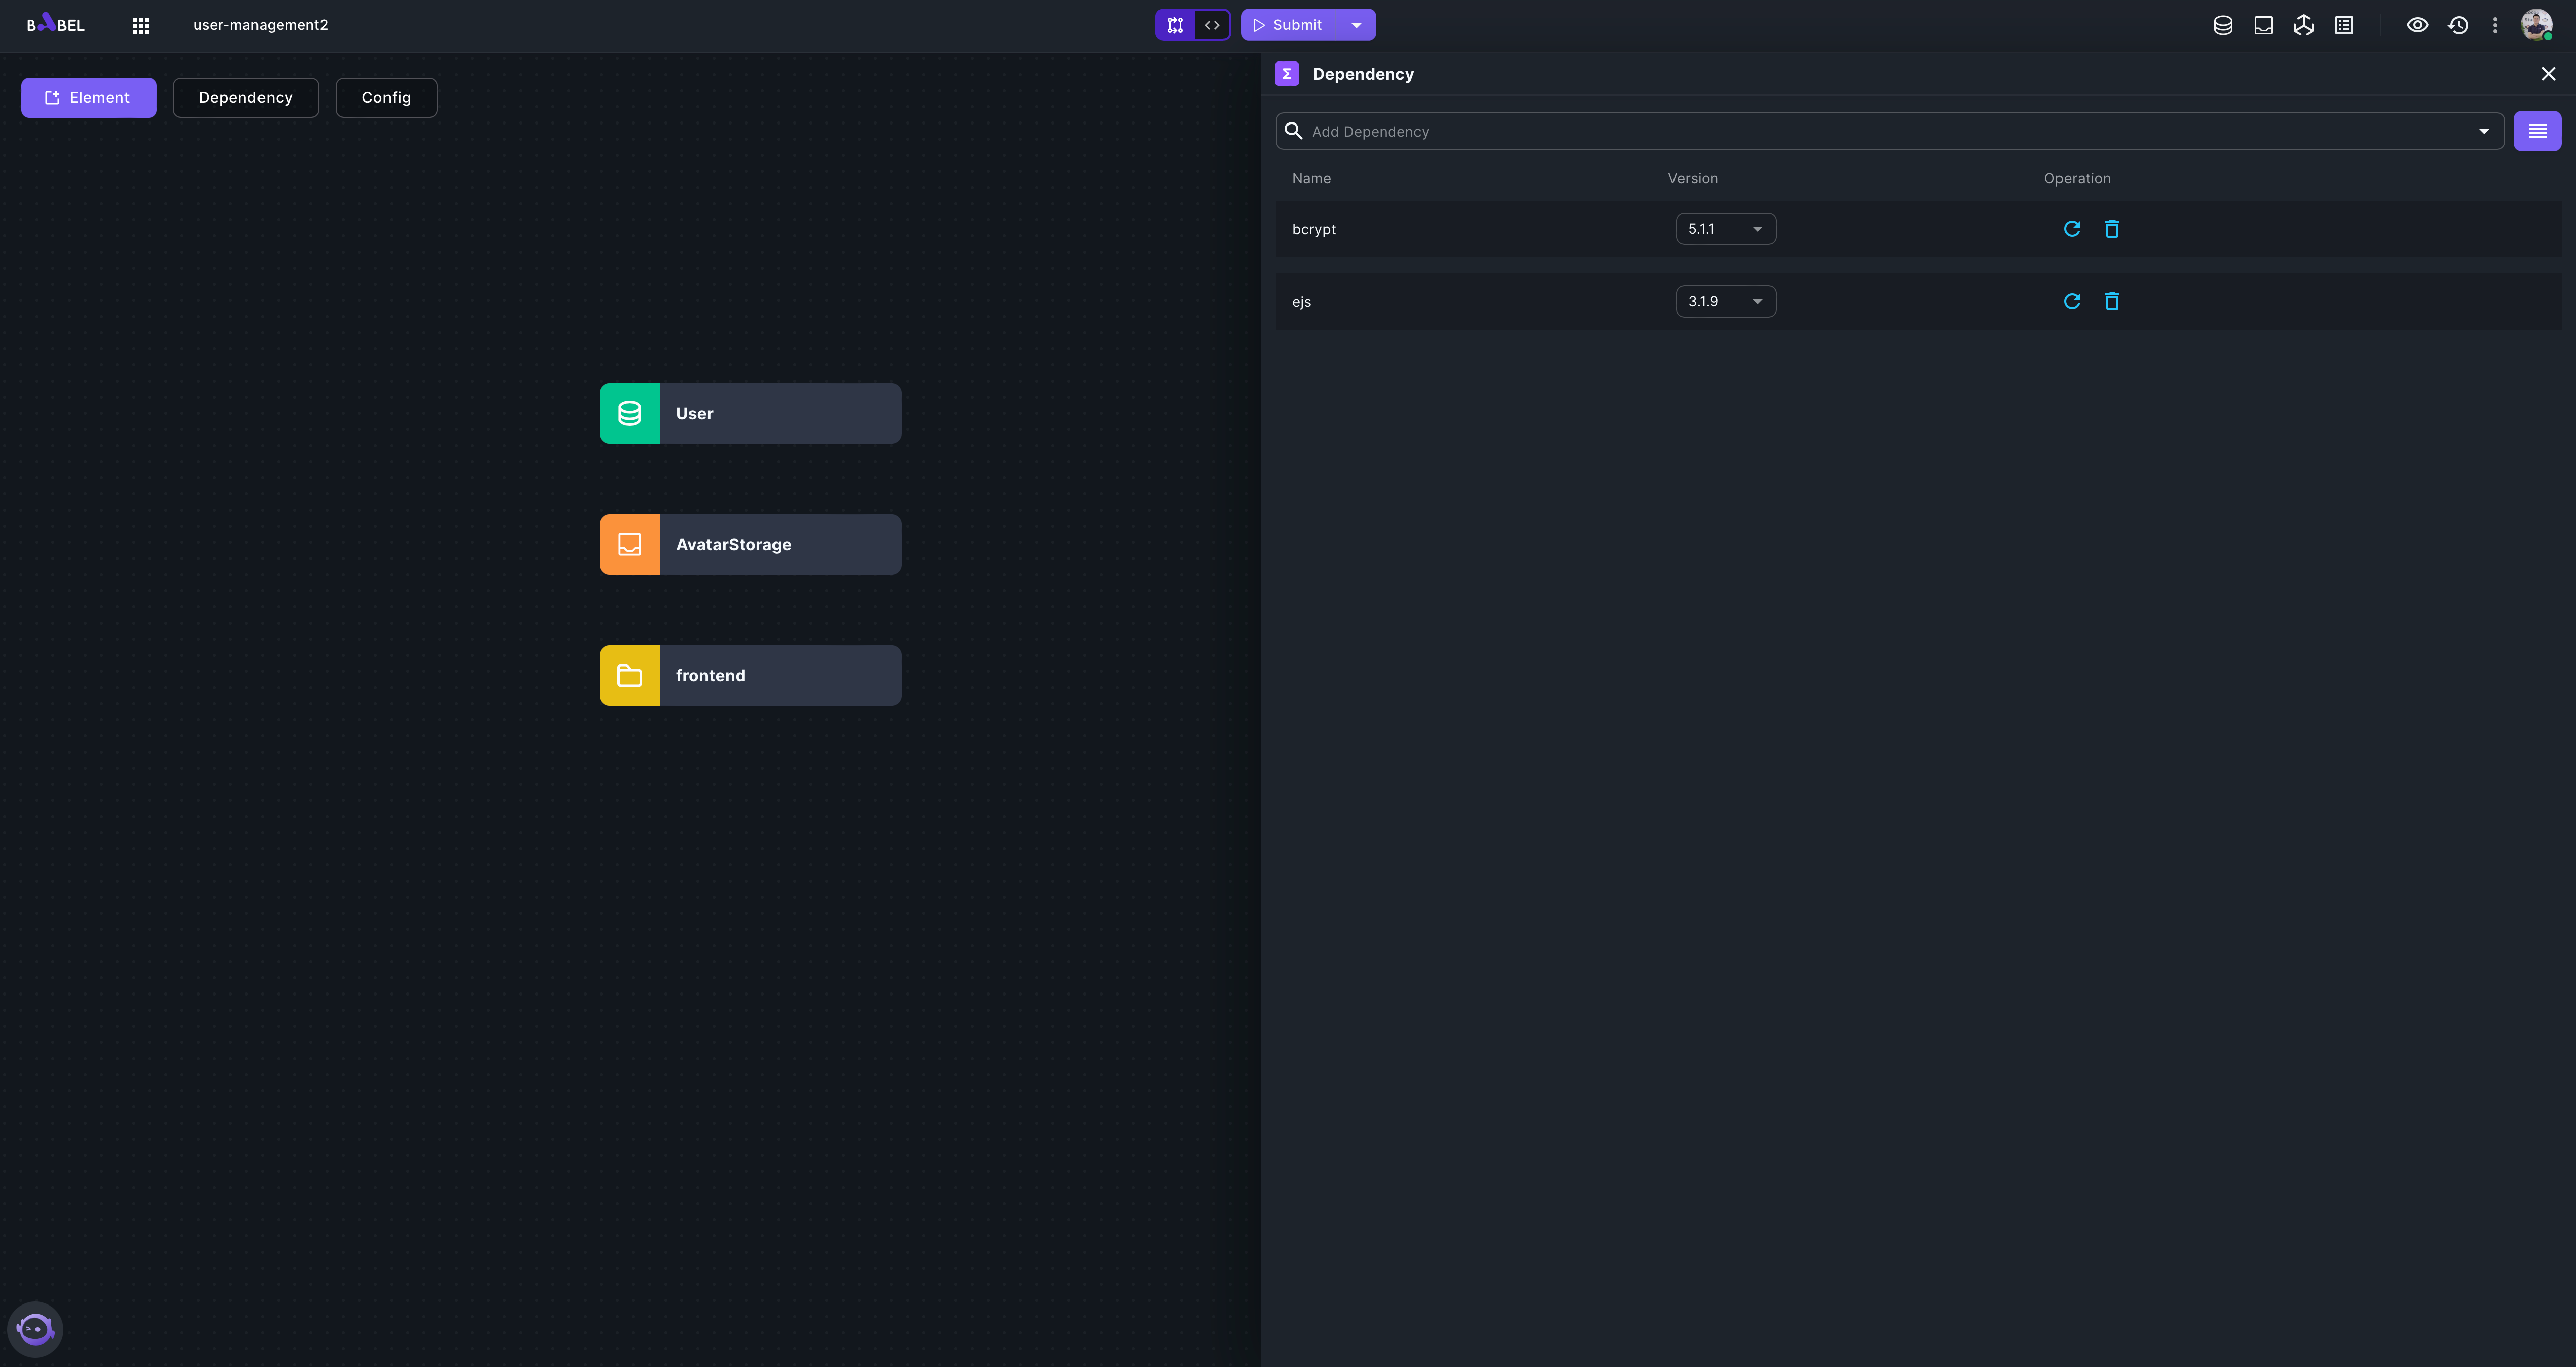
Add dependencies
In this project , we use ejs to render pages and use bcrypt to encrypt user passwords. We should add ejs and bcrypt to the dependencies.
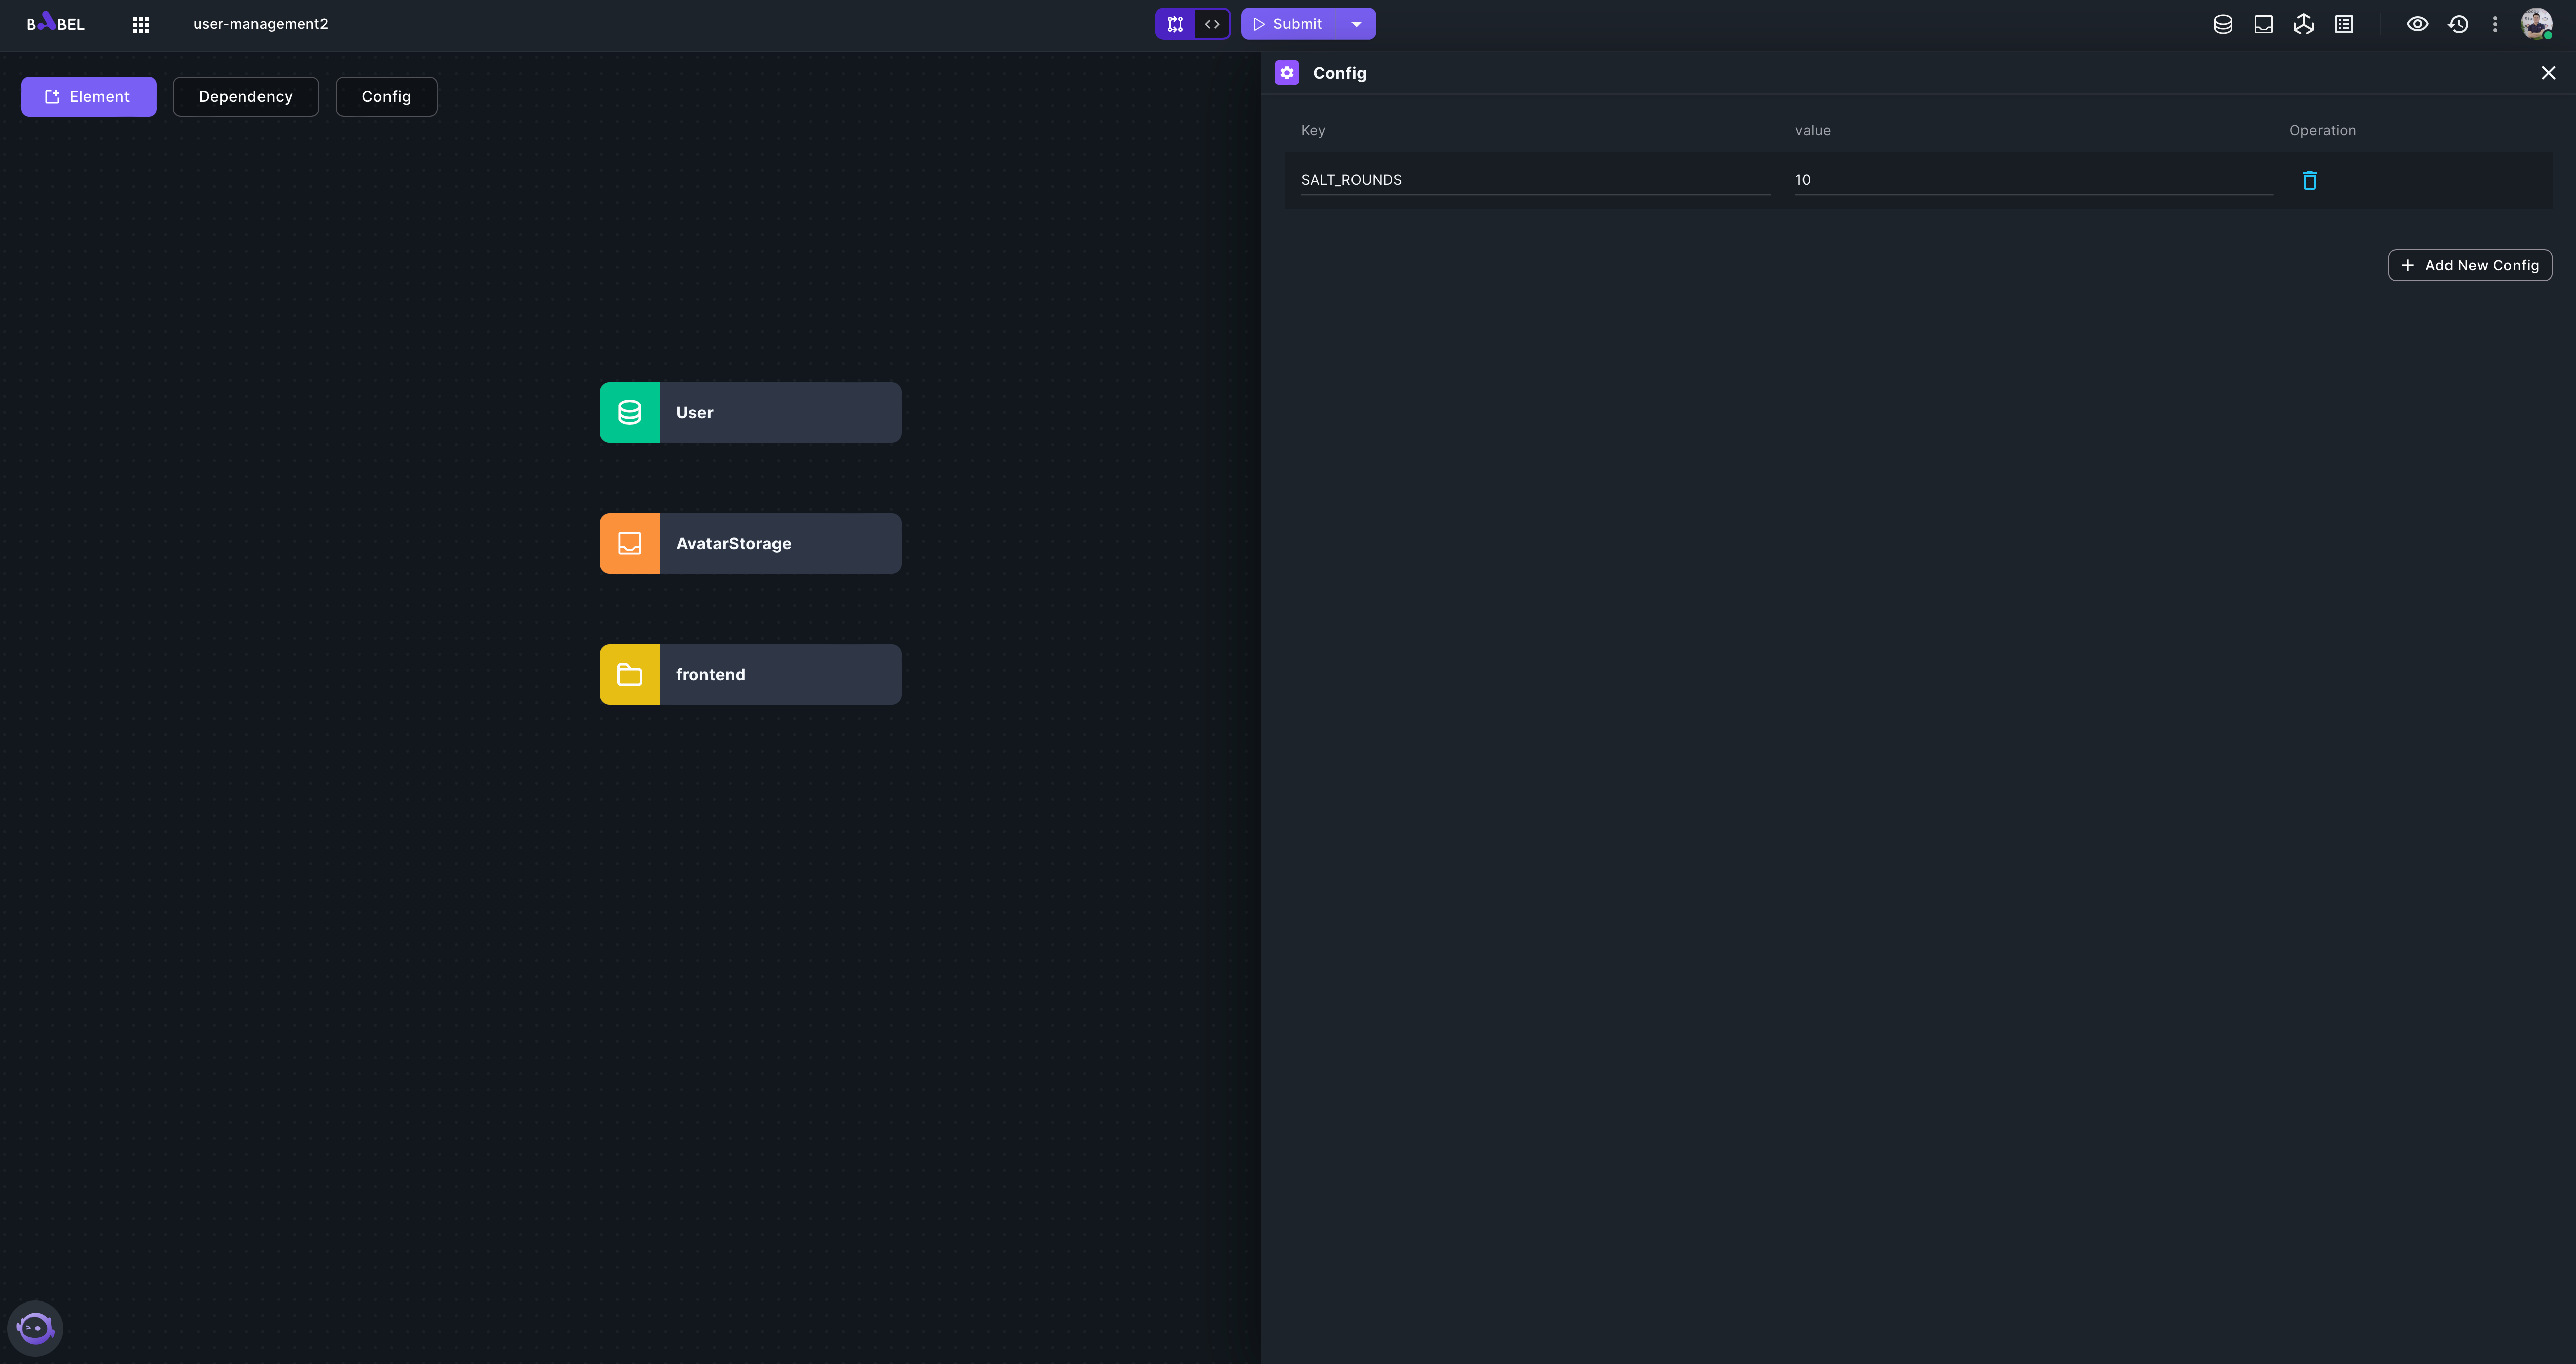
Bcrypt needs a static value as encryption salt. This value is set in config.
-
Add HTTP endpoints to render ejs pages.
Switch to EditView and add three HTTP elements with url path "/register", "/login", "/update-profile". The code for the HTTP elements:
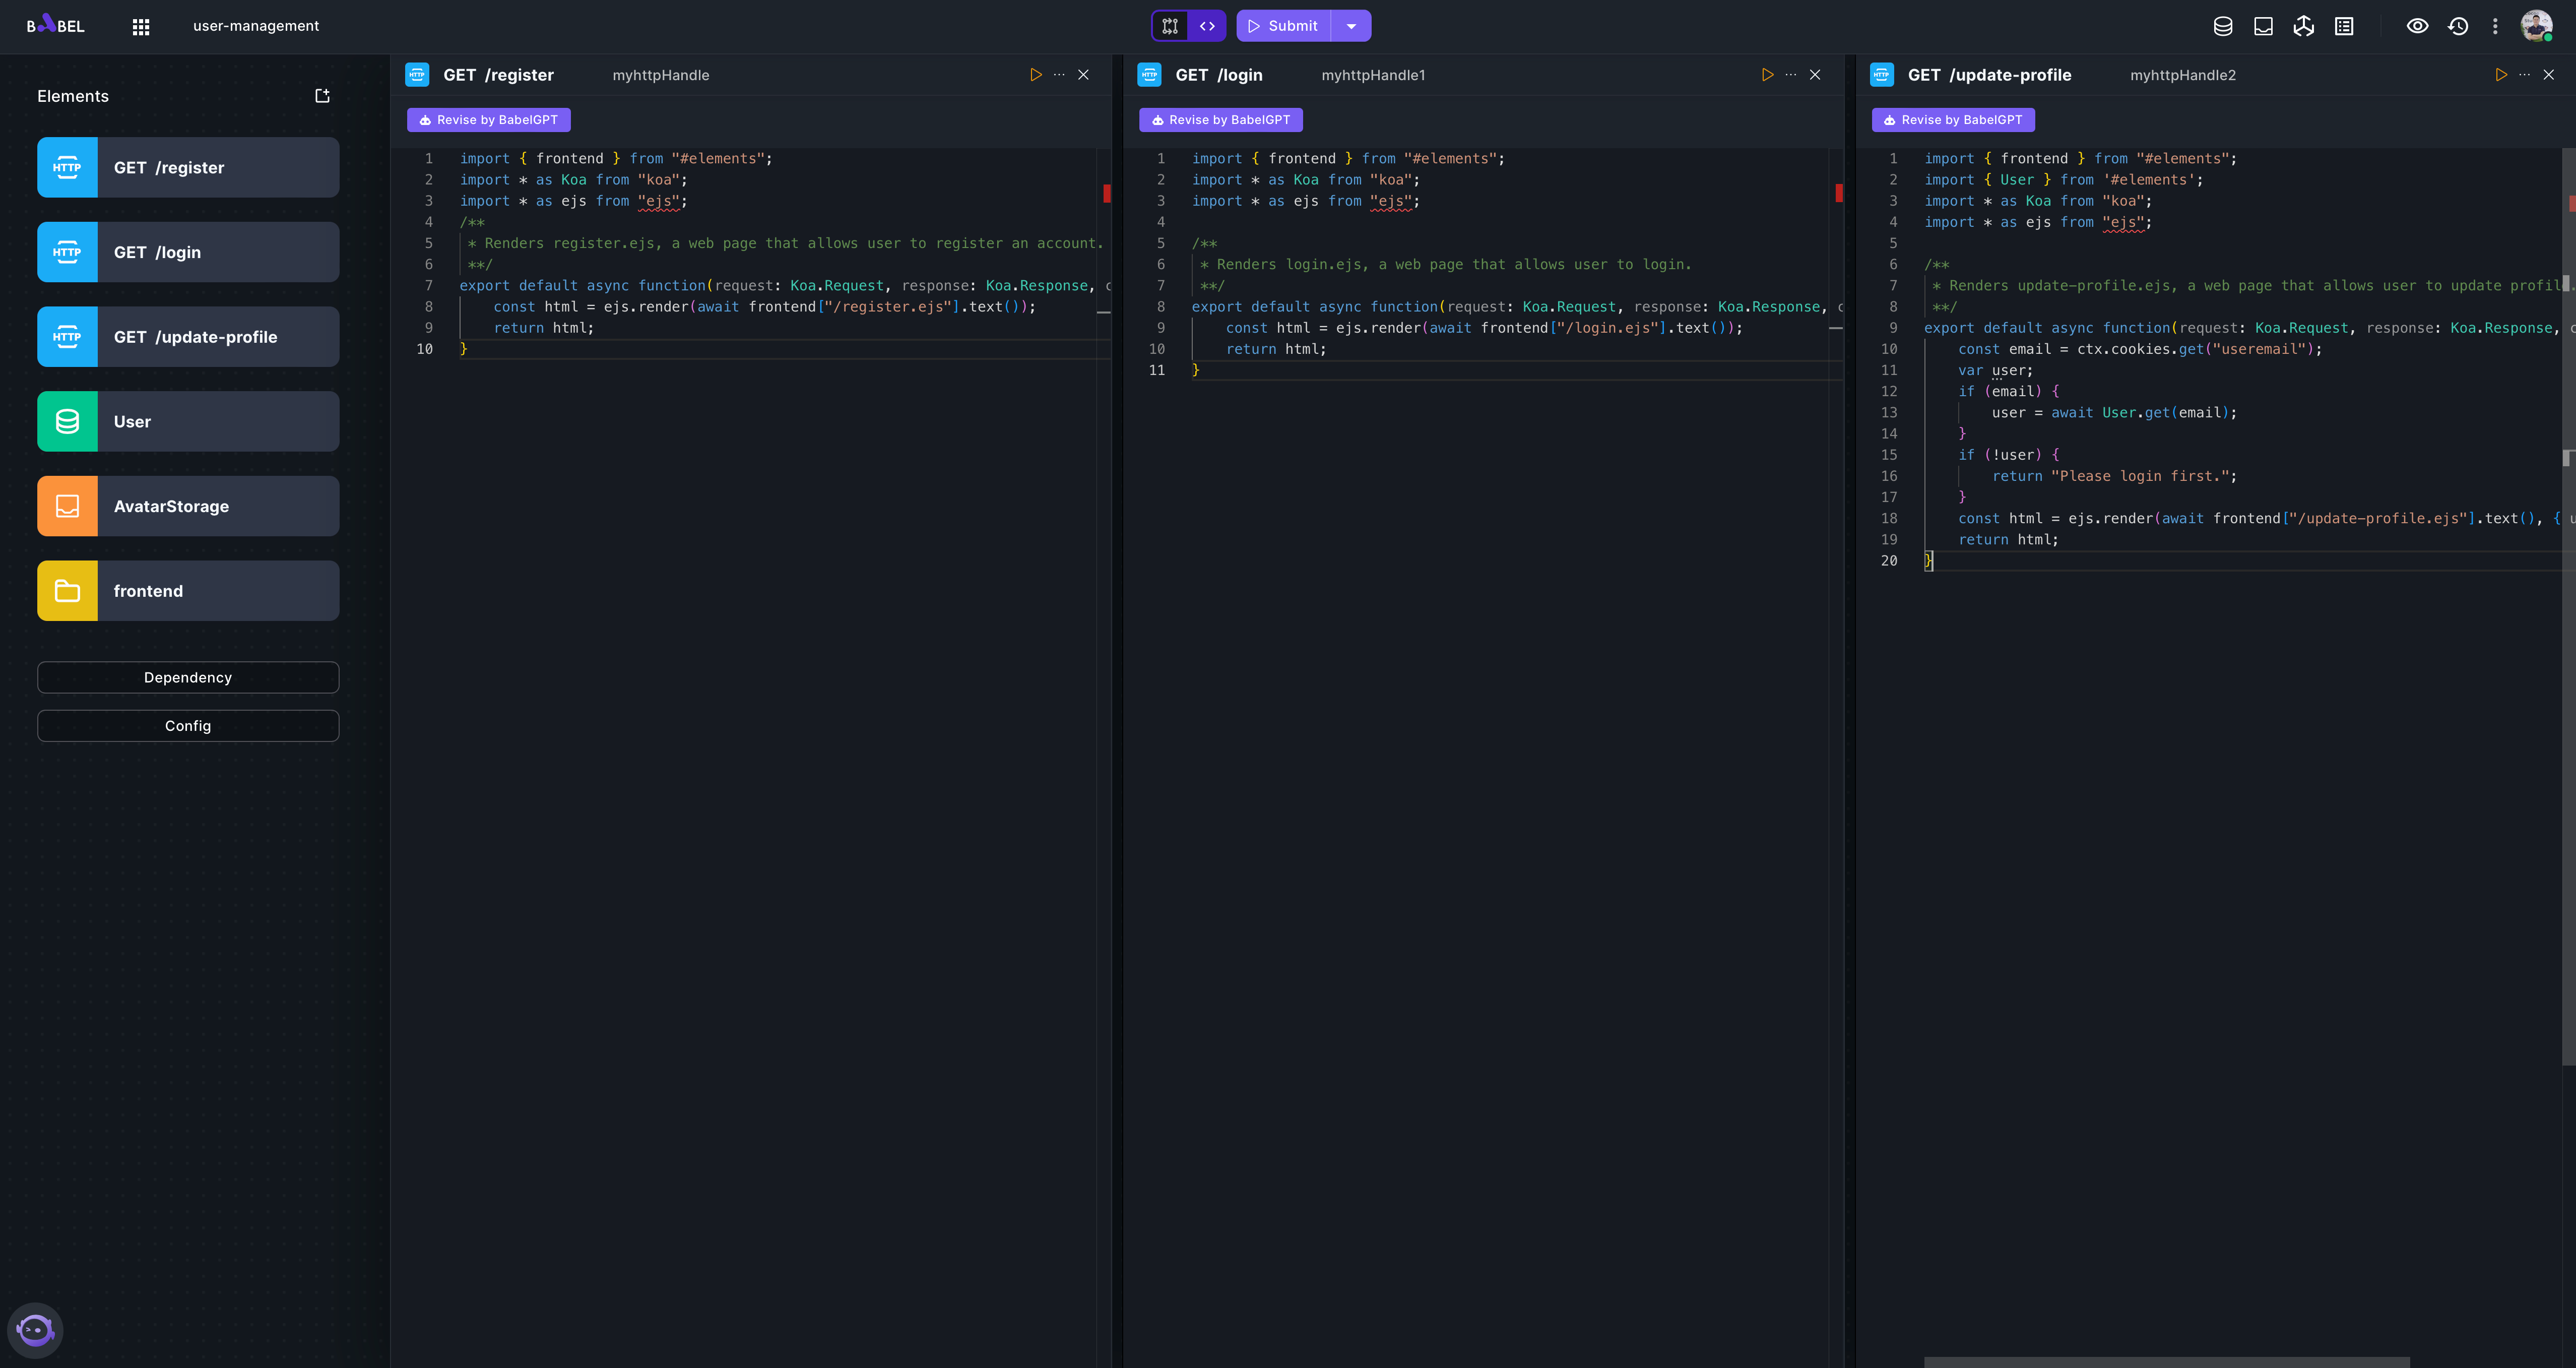
import { frontend } from "#elements";
import * as Koa from "koa";
import * as ejs from "ejs";
/**
 * Renders register.ejs, a web page that allows user to register an account.
 **/
export default async function(request: Koa.Request, response: Koa.Response, ctx: Koa.Context) {
    const html = ejs.render(await frontend["/register.ejs"].text());
    return html;
}
import { frontend } from "#elements";
import * as Koa from "koa";
import * as ejs from "ejs";
/**
* Renders login.ejs, a web page that allows user to login.
**/
export default async function(request: Koa.Request, response: Koa.Response, ctx: Koa.Context) {
const html = ejs.render(await frontend["/login.ejs"].text());
return html;
}import { frontend } from "#elements";
import { User } from '#elements';
import * as Koa from "koa";
import * as ejs from "ejs";
/**
* Renders update-profile.ejs, a web page that allows user to update profile.
**/
export default async function(request: Koa.Request, response: Koa.Response, ctx: Koa.Context) {
const email = ctx.cookies.get("useremail");
var user;
if (email) {
user = await User.get(email);
}
if (!user) {
return "Please login first.";
}
const html = ejs.render(await frontend["/update-profile.ejs"].text(), { user });
return html;
} -
Add HTTP endpoints to handle request from pages
The requests sent from ejs pages are POST requests. Build a backend API for each of the requests. Add four POST HTTP elements "/register", "/login", "/update-profile", "/upload-avatar":
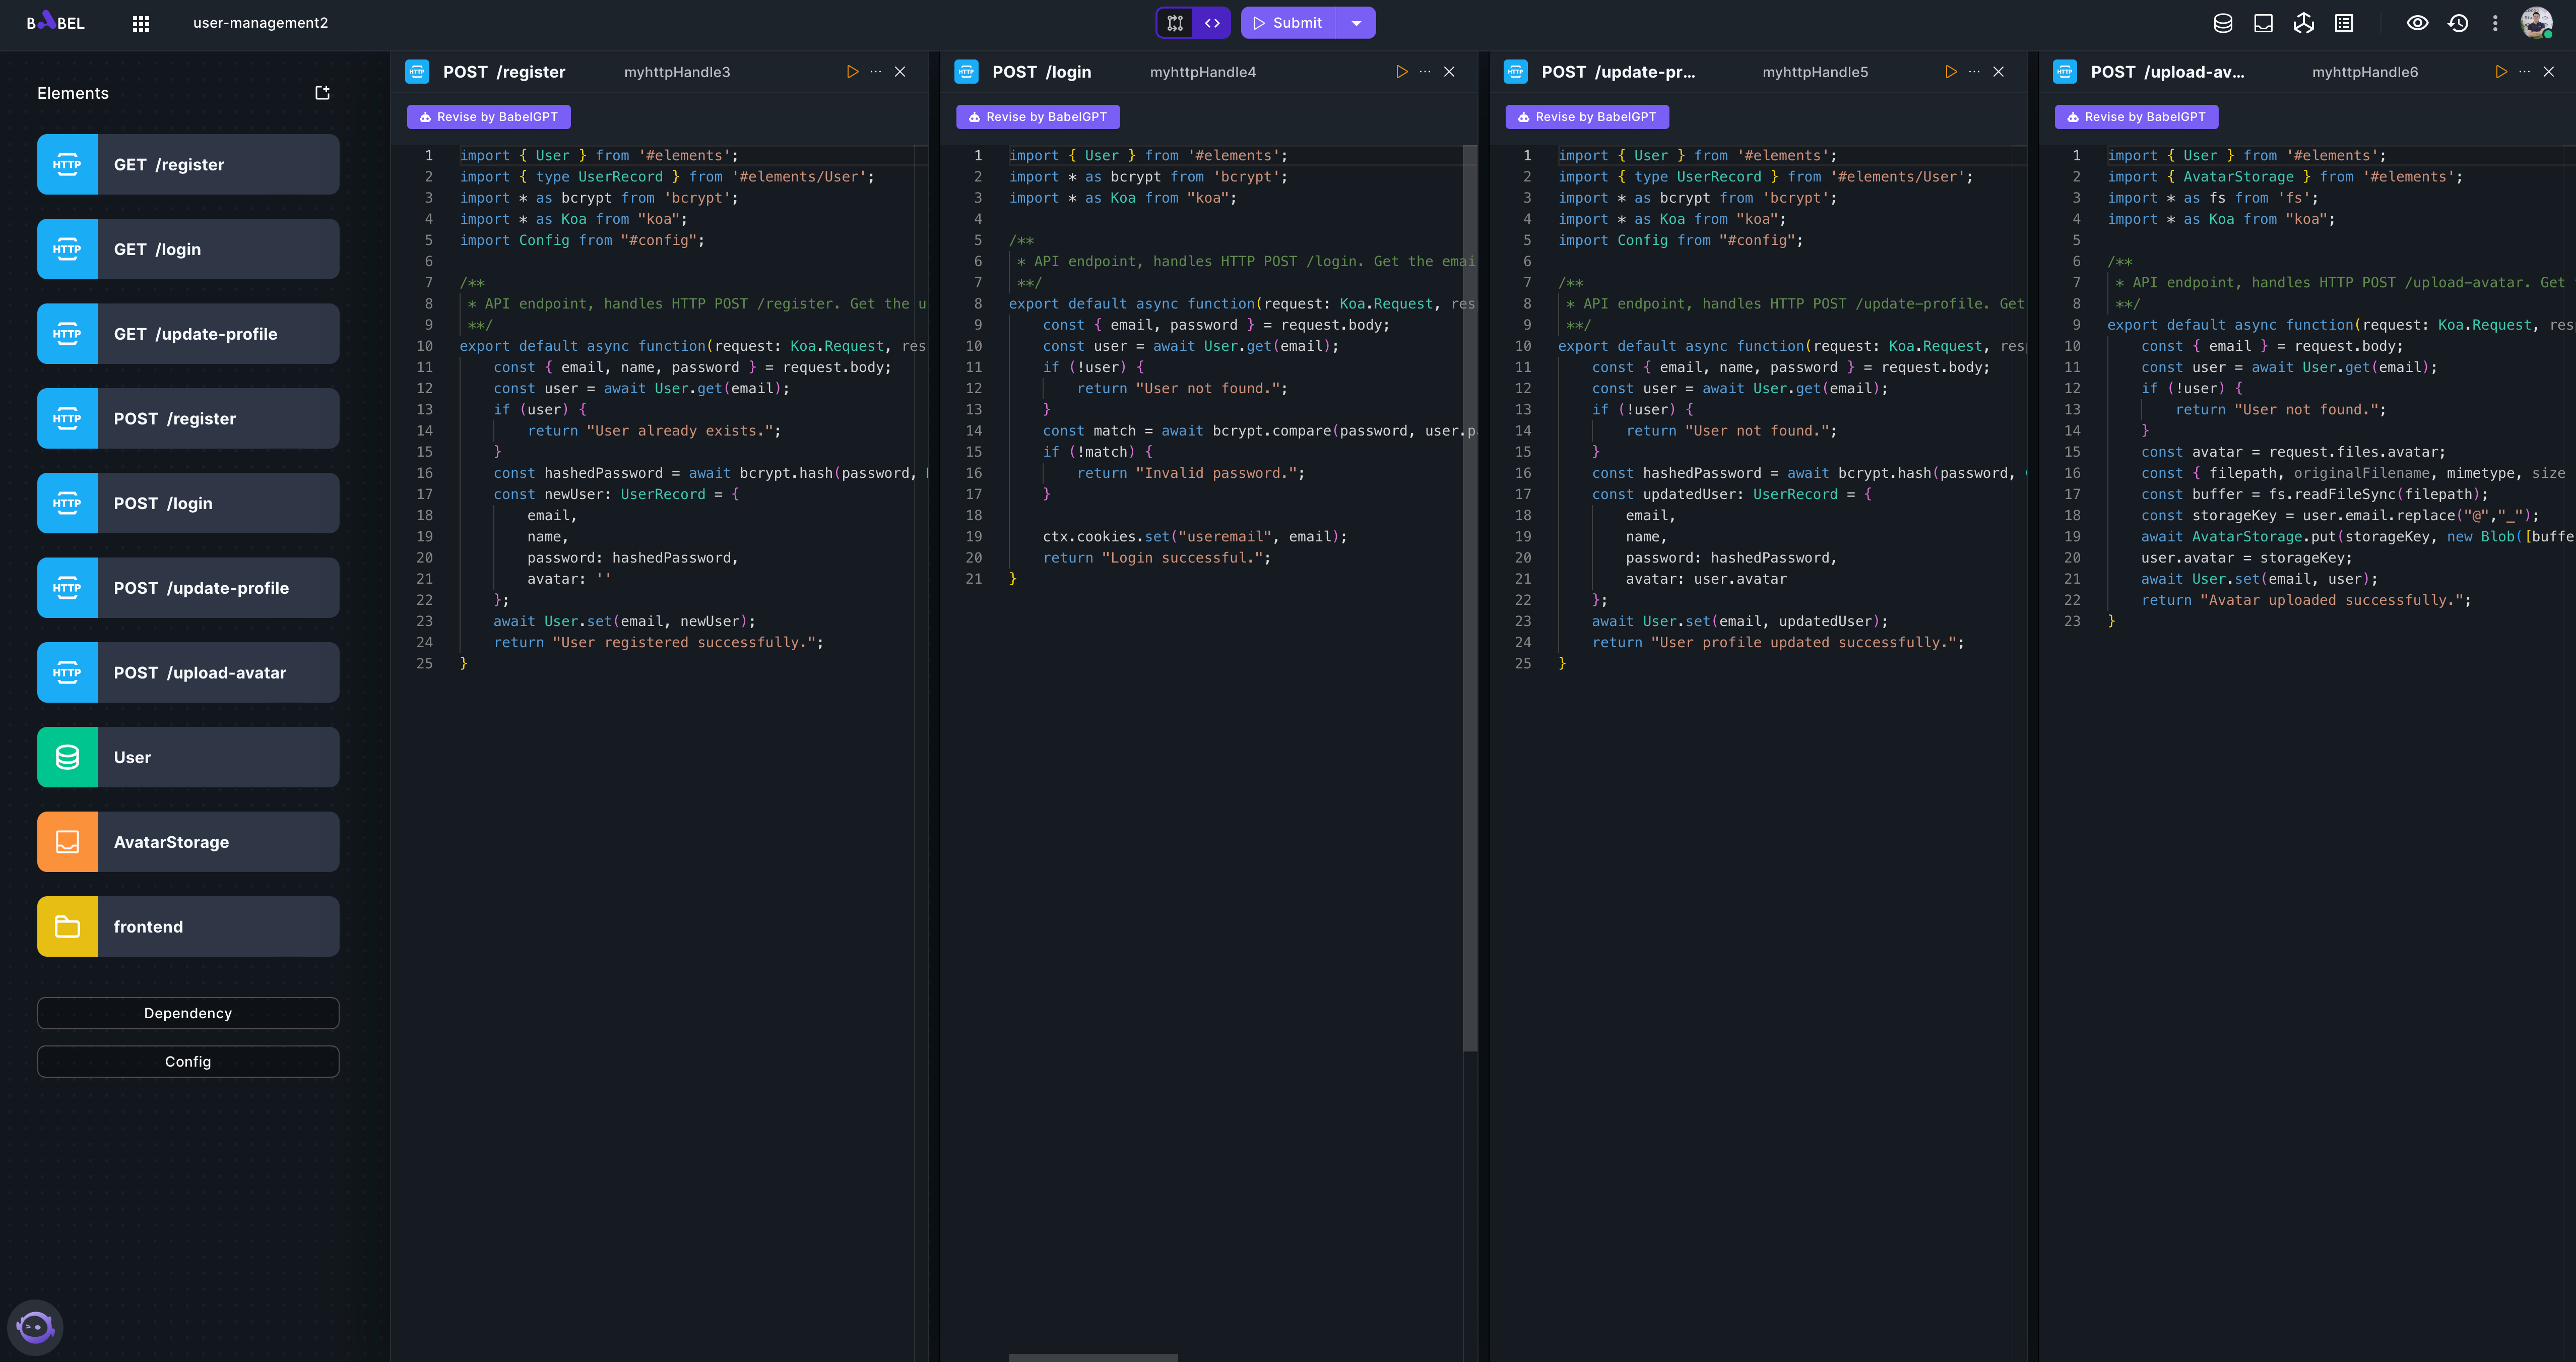
import { User } from '#elements';
import { type UserRecord } from '#elements/User';
import * as bcrypt from 'bcrypt';
import * as Koa from "koa";
import Config from "#config";

/**
 * API endpoint, handles HTTP POST /register. Get the user info through POST message. Save the user info to the User database.
 **/
export default async function(request: Koa.Request, response: Koa.Response, ctx: Koa.Context) {
    const { email, name, password } = request.body;
    const user = await User.get(email);
    if (user) {
        return "User already exists.";
    }
    const hashedPassword = await bcrypt.hash(password, Number(Config.SALT_ROUNDS));
    const newUser: UserRecord = {
        email,
        name,
        password: hashedPassword,
        avatar: ''
    };
    await User.set(email, newUser);
    return "User registered successfully.";
}
import { User } from '#elements';
import * as bcrypt from 'bcrypt';
import * as Koa from "koa";
/**
* API endpoint, handles HTTP POST /login. Get the email and password through POST message. Check the email and password in the User database.
**/
export default async function(request: Koa.Request, response: Koa.Response, ctx: Koa.Context) {
const { email, password } = request.body;
const user = await User.get(email);
if (!user) {
return "User not found.";
}
const match = await bcrypt.compare(password, user.password);
if (!match) {
return "Invalid password.";
}
ctx.cookies.set("useremail", email);
return "Login successful.";
}import { User } from '#elements';
import { type UserRecord } from '#elements/User';
import * as bcrypt from 'bcrypt';
import * as Koa from "koa";
import Config from "#config";
/**
* API endpoint, handles HTTP POST /update-profile. Get the user info through POST message. Update the user info in the User database.
**/
export default async function(request: Koa.Request, response: Koa.Response, ctx: Koa.Context) {
const { email, name, password } = request.body;
const user = await User.get(email);
if (!user) {
return "User not found.";
}
const hashedPassword = await bcrypt.hash(password, Config.SALT_ROUNDS);
const updatedUser: UserRecord = {
email,
name,
password: hashedPassword,
avatar: user.avatar
};
await User.set(email, updatedUser);
return "User profile updated successfully.";
}import { User } from '#elements';
import { AvatarStorage } from '#elements';
import * as fs from 'fs';
import * as Koa from "koa";
/**
* API endpoint, handles HTTP POST /upload-avatar. Get the avatar file through POST message. Save the avatar file to the AvatarStorage storage.
**/
export default async function(request: Koa.Request, response: Koa.Response, ctx: Koa.Context) {
const { email } = request.body;
const user = await User.get(email);
if (!user) {
return "User not found.";
}
const avatar = request.files.avatar;
const { filepath, originalFilename, mimetype, size } = avatar;
const buffer = fs.readFileSync(filepath);
const storageKey = user.email.replace("@","_");
await AvatarStorage.put(storageKey, new Blob([buffer], {type: mimetype}));
user.avatar = storageKey;
await User.set(email, user);
return "Avatar uploaded successfully.";
} -
Add a HTTP api to return avatar image
As the avatar image is stored in the Storage element, which can not be accessed directly, we need an API to handle the request from webpage to return the image. Switch back to ArchView and add a GET HTTP element with url path "/getAvatar".
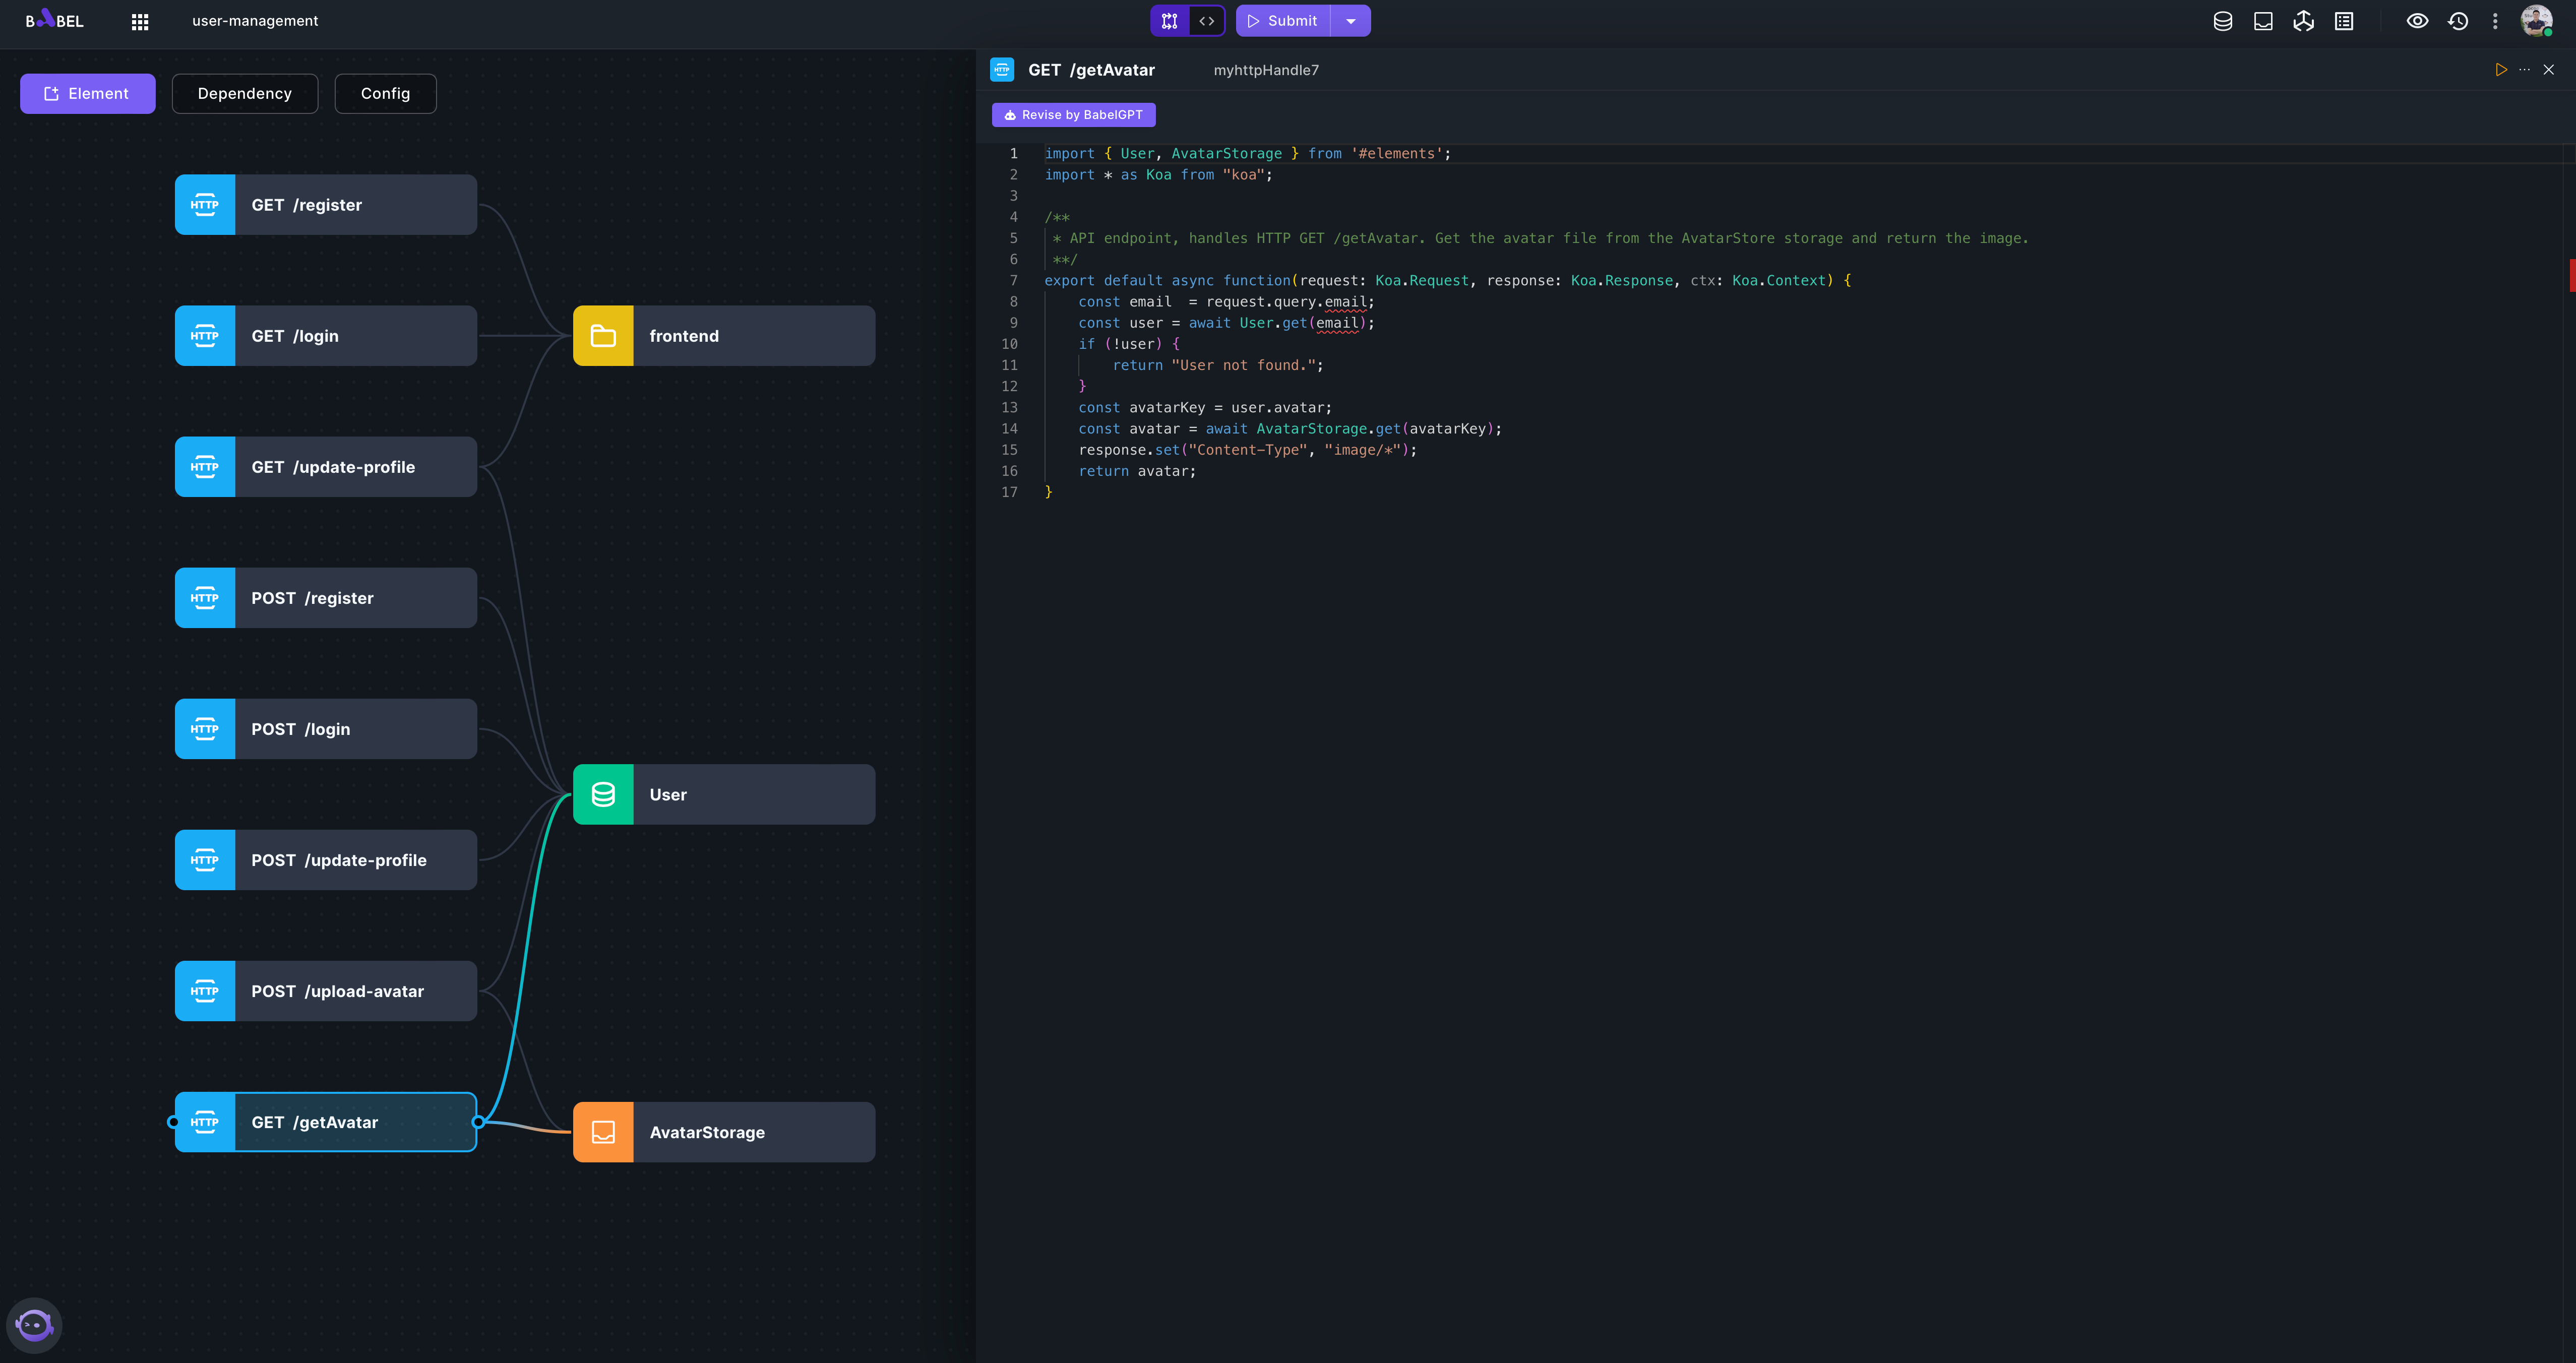
import { User, AvatarStorage } from '#elements';
import * as Koa from "koa";

/**
 * API endpoint, handles HTTP GET /getAvatar. Get the avatar file from the AvatarStorage storage and return the image.
 **/
export default async function(request: Koa.Request, response: Koa.Response, ctx: Koa.Context) {
    const email  = request.query.email;
    const user = await User.get(email);
    if (!user) {
        return "User not found.";
    }
    const avatarKey = user.avatar;
    const avatar = await AvatarStorage.get(avatarKey);
    response.set("Content-Type", "image/*");
    return avatar;
} -
Submit and Run
Submit the Babel app and wait for the completion of the submission. The Submit button will change to Run.
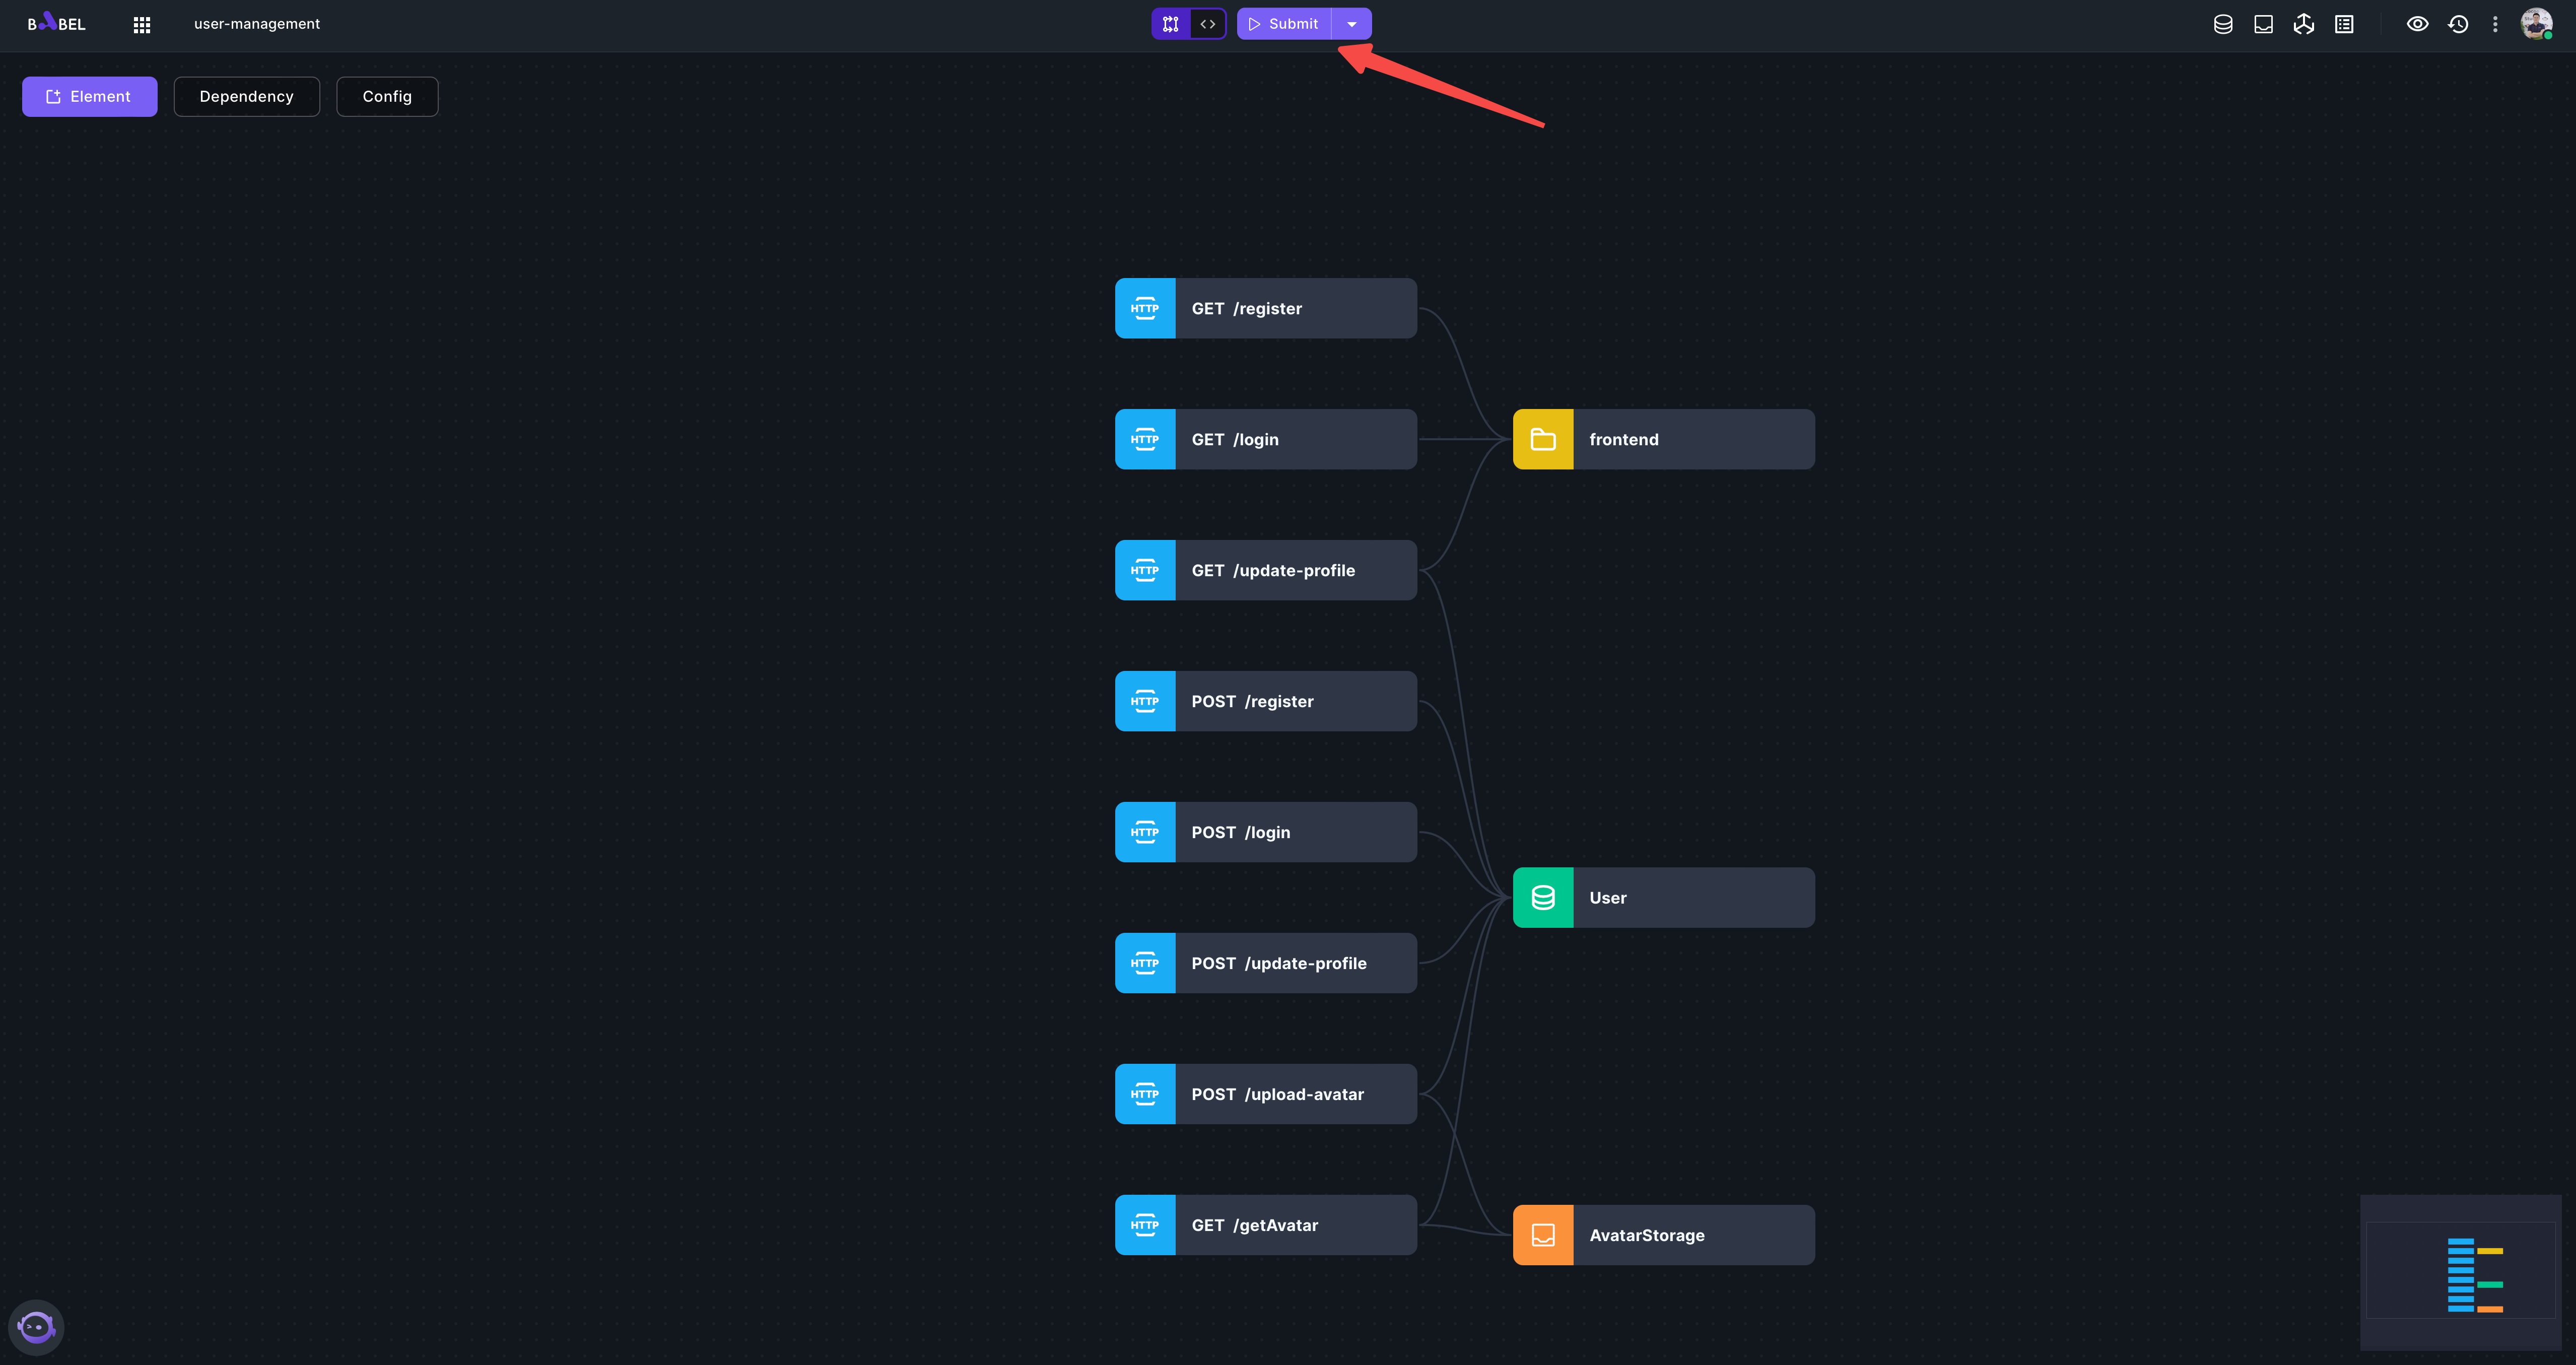
Click Run and select "GET /register" and select "open in new tab".
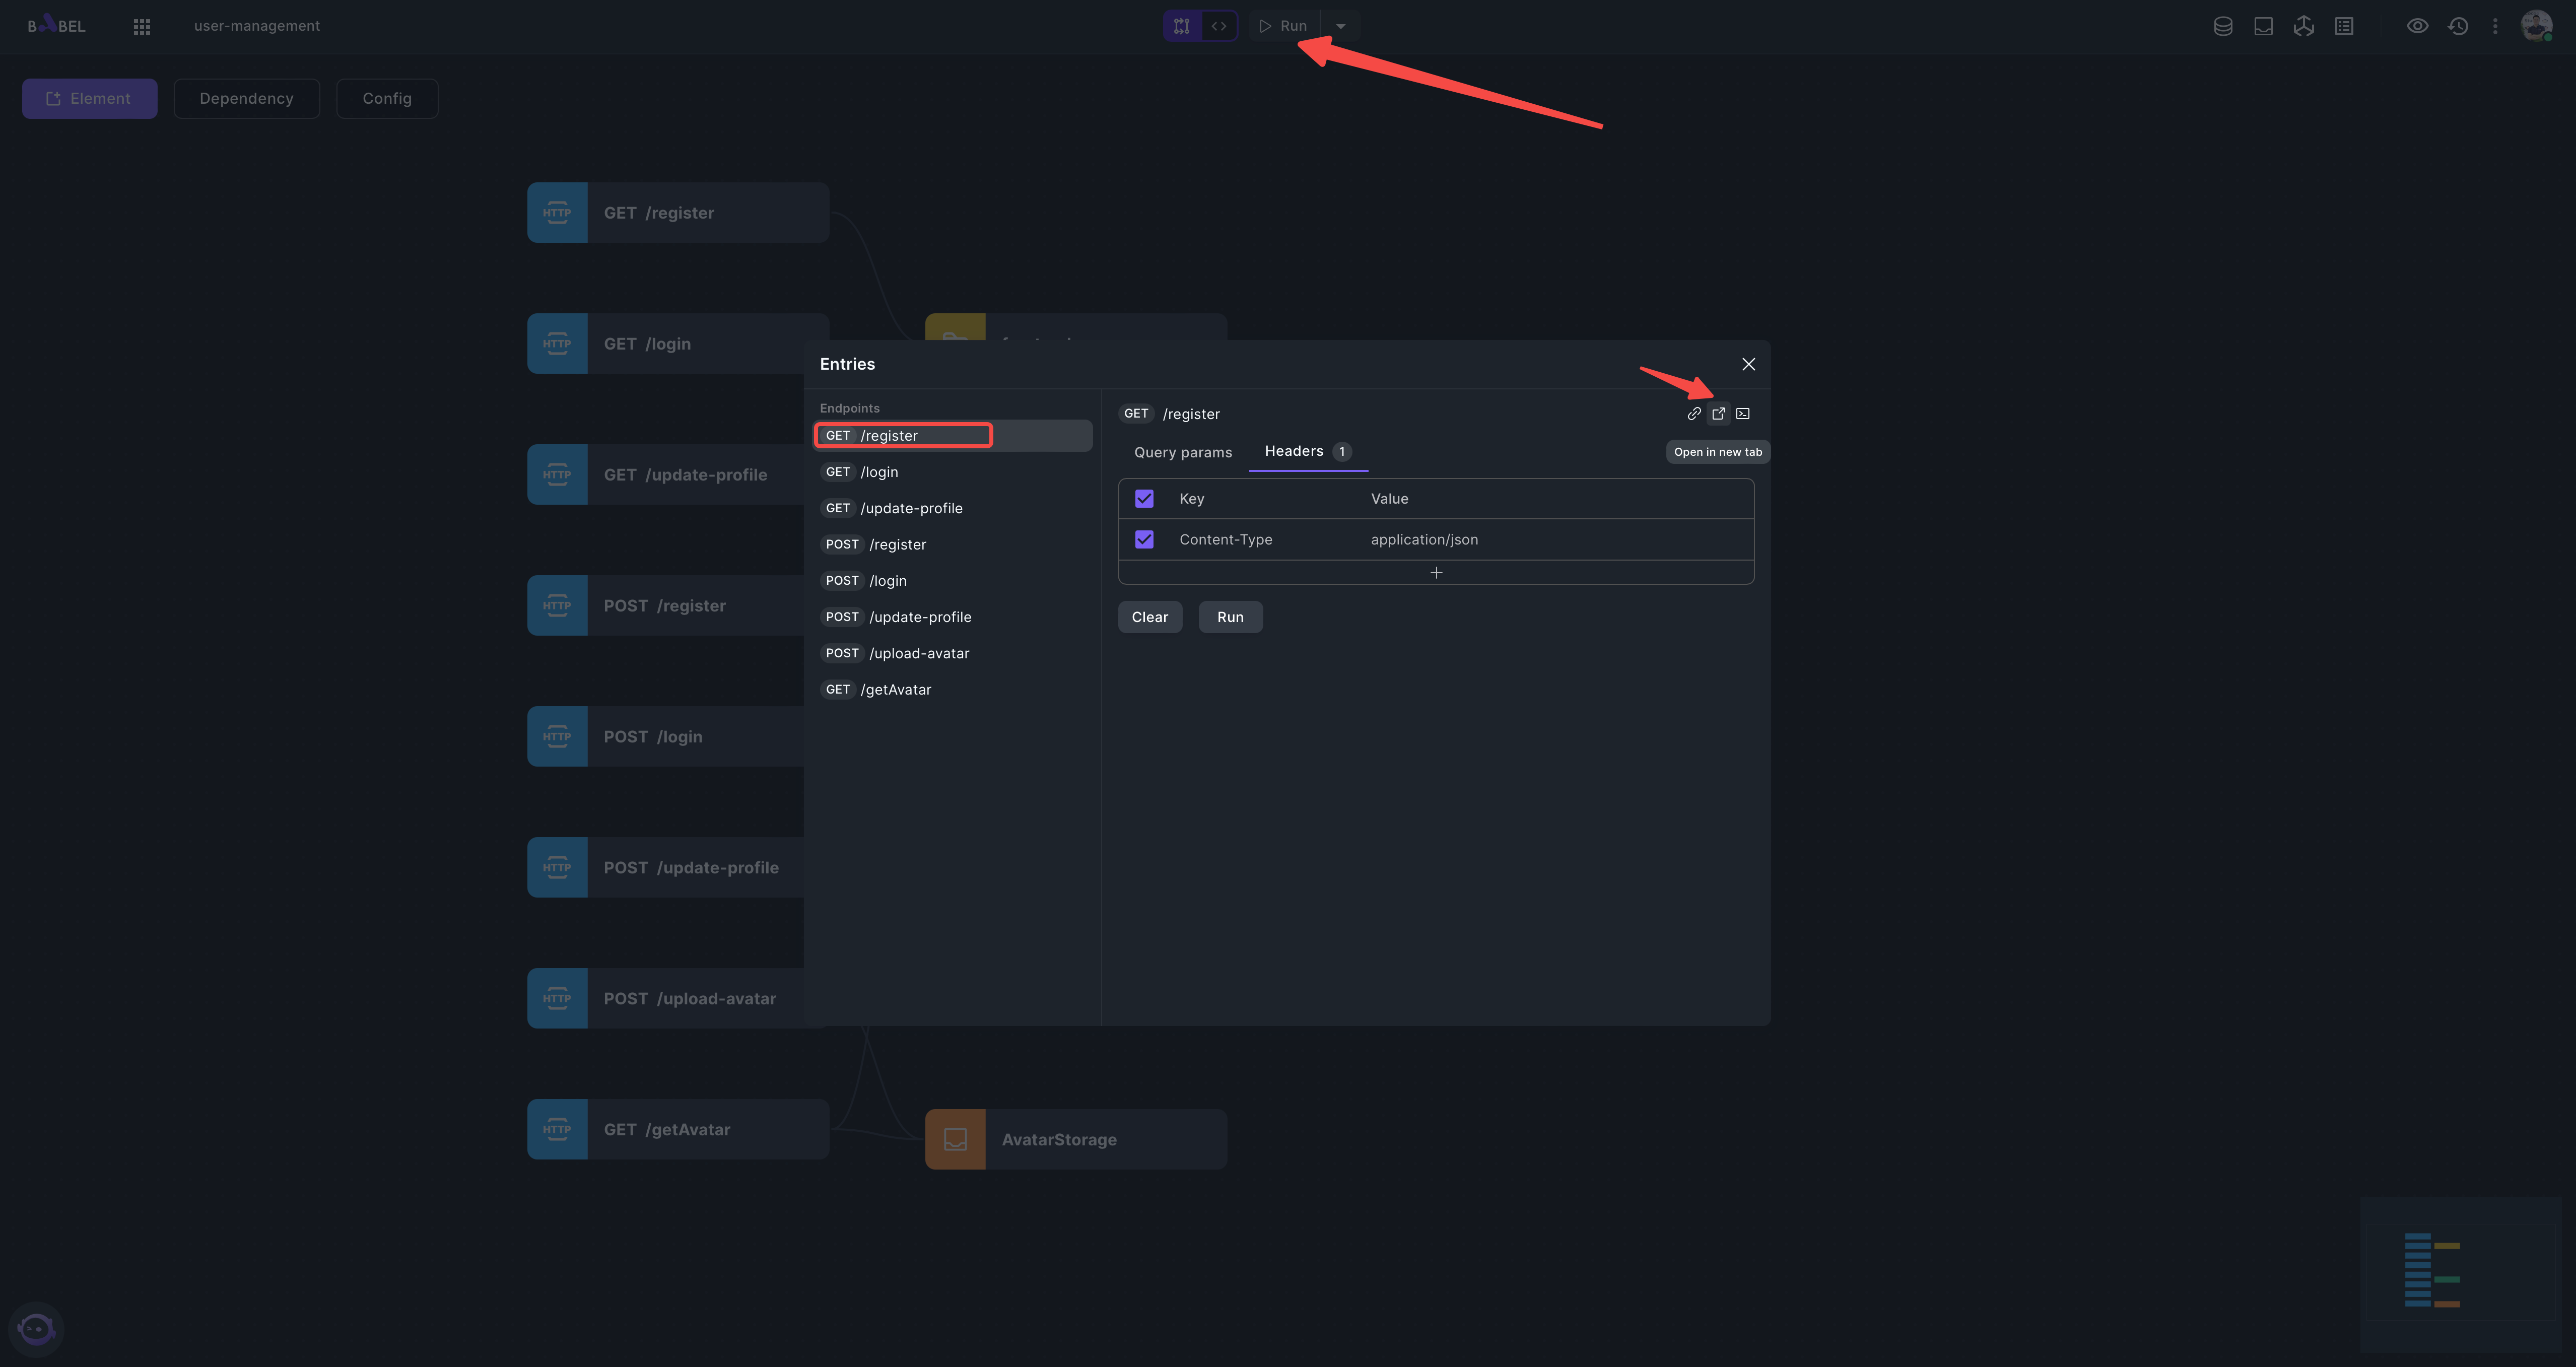
You should see a page like this:
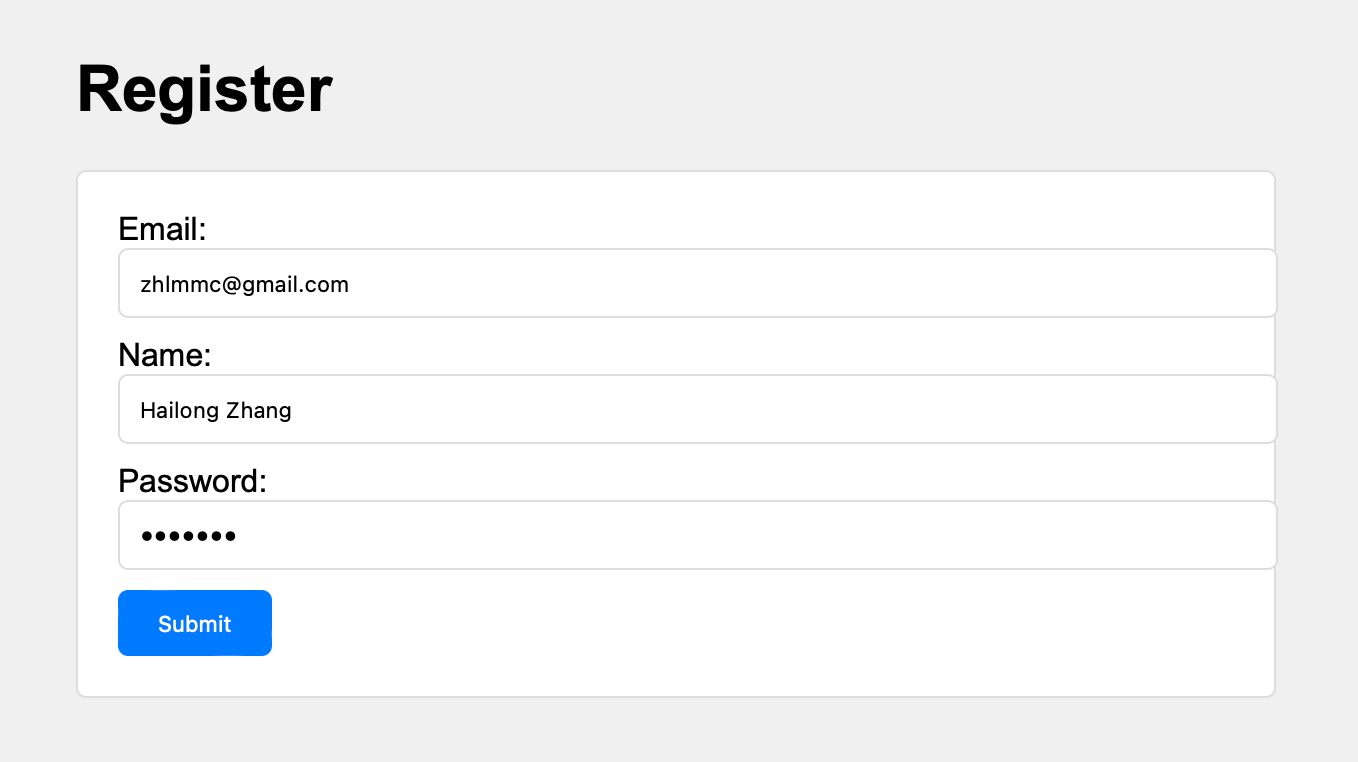
Click Submit, you should see a message "User registered successfully.".
-
Check Database and Storage console
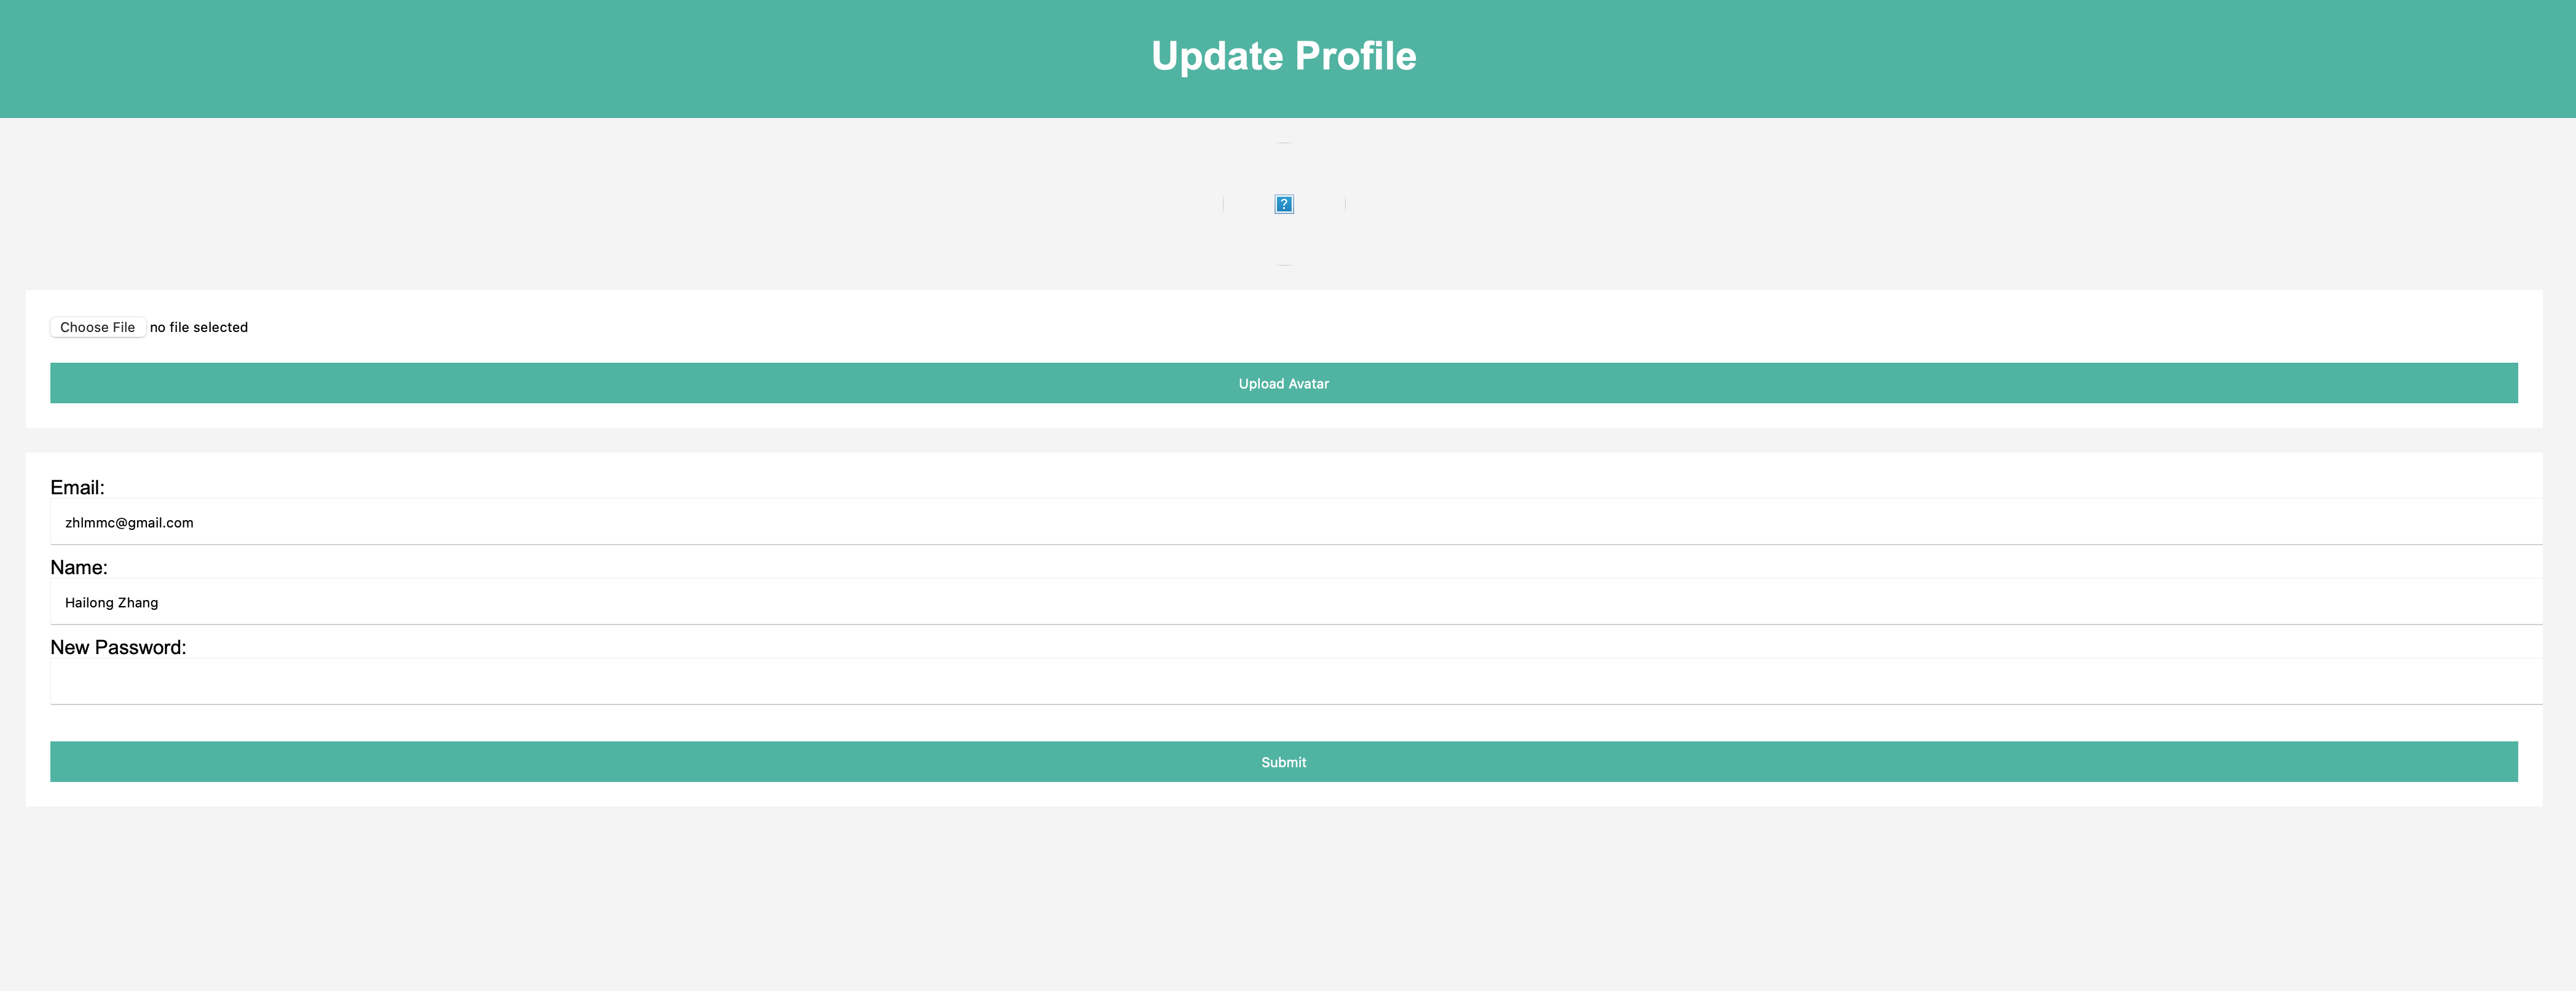
Access "/login" page and input the email and password just registered and then access "/update-profile". You should see a page like this:
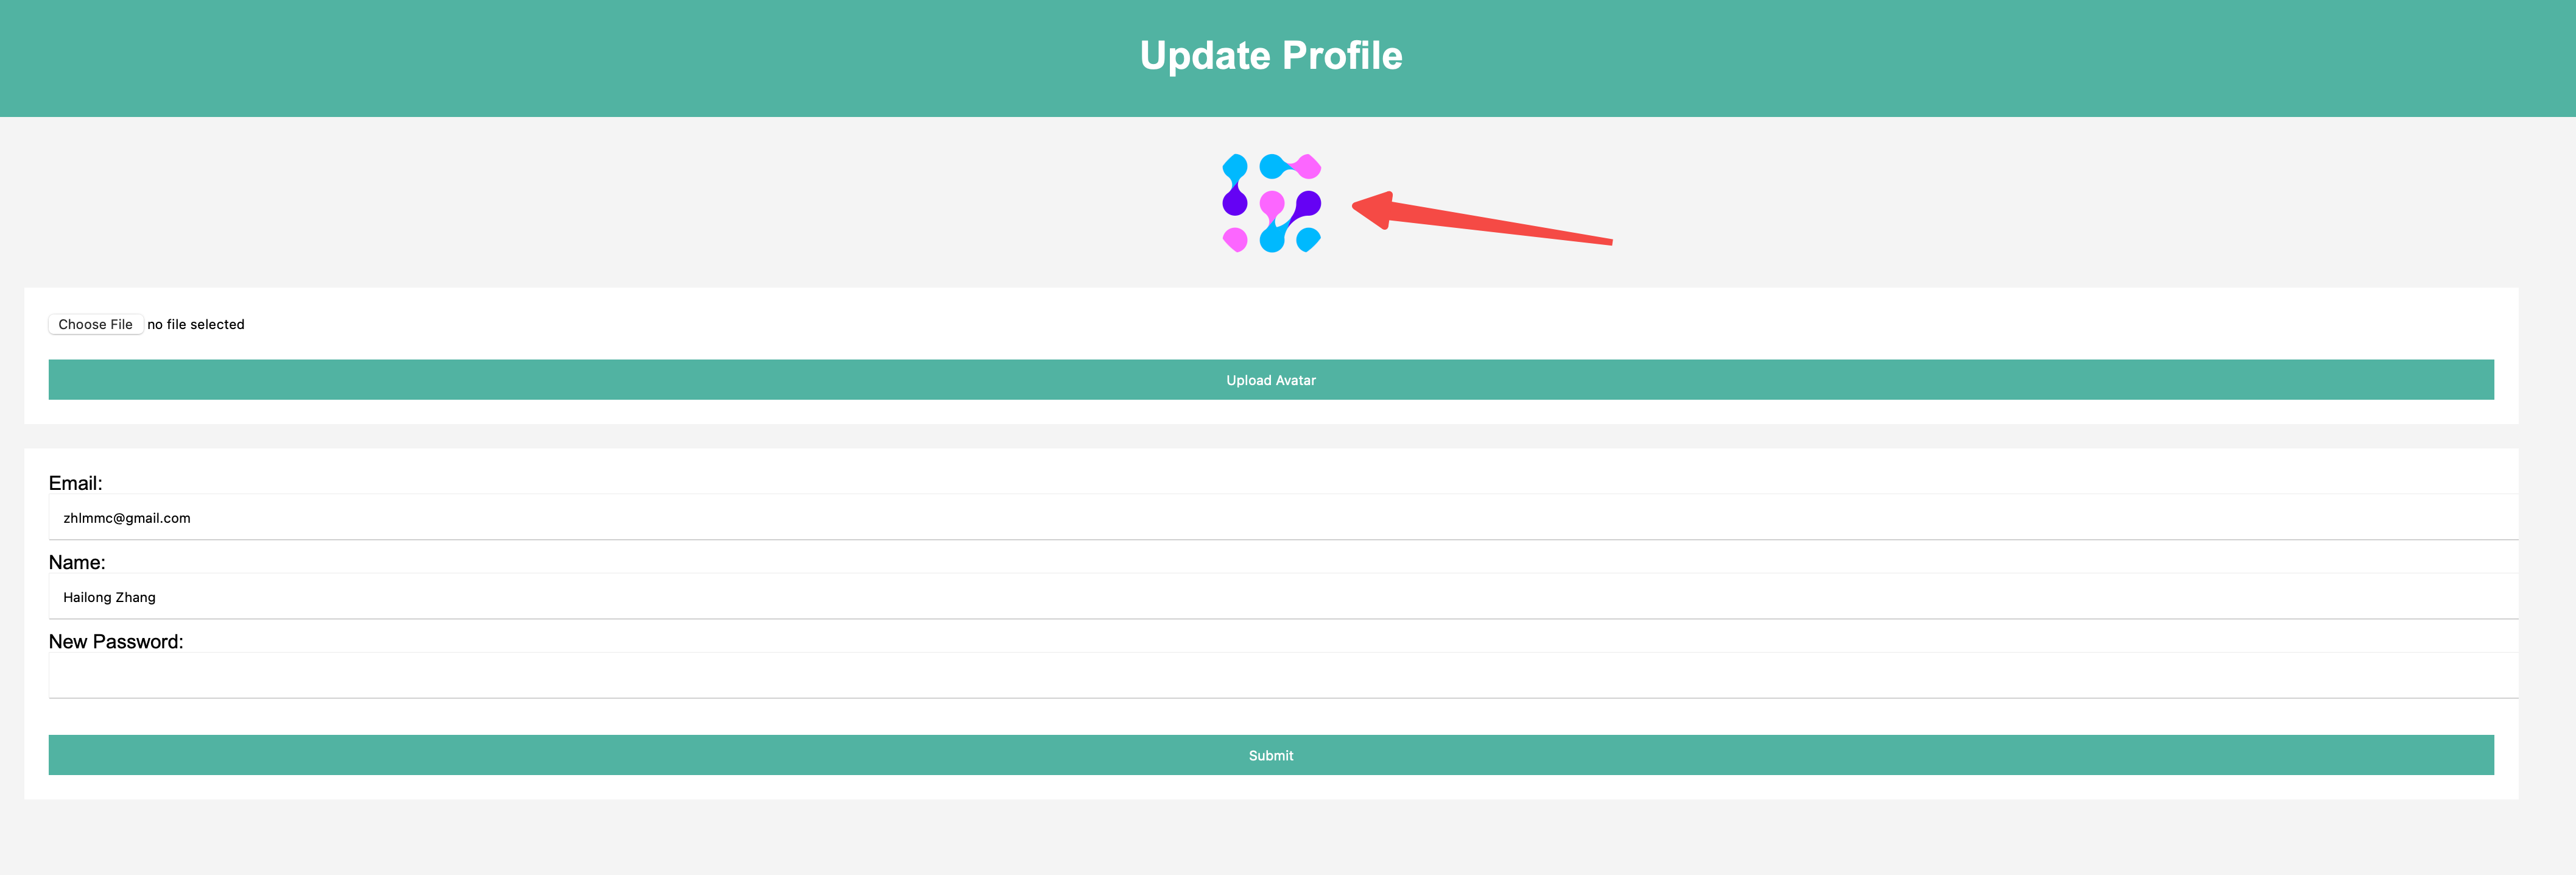
Upload a picture and refresh the page:
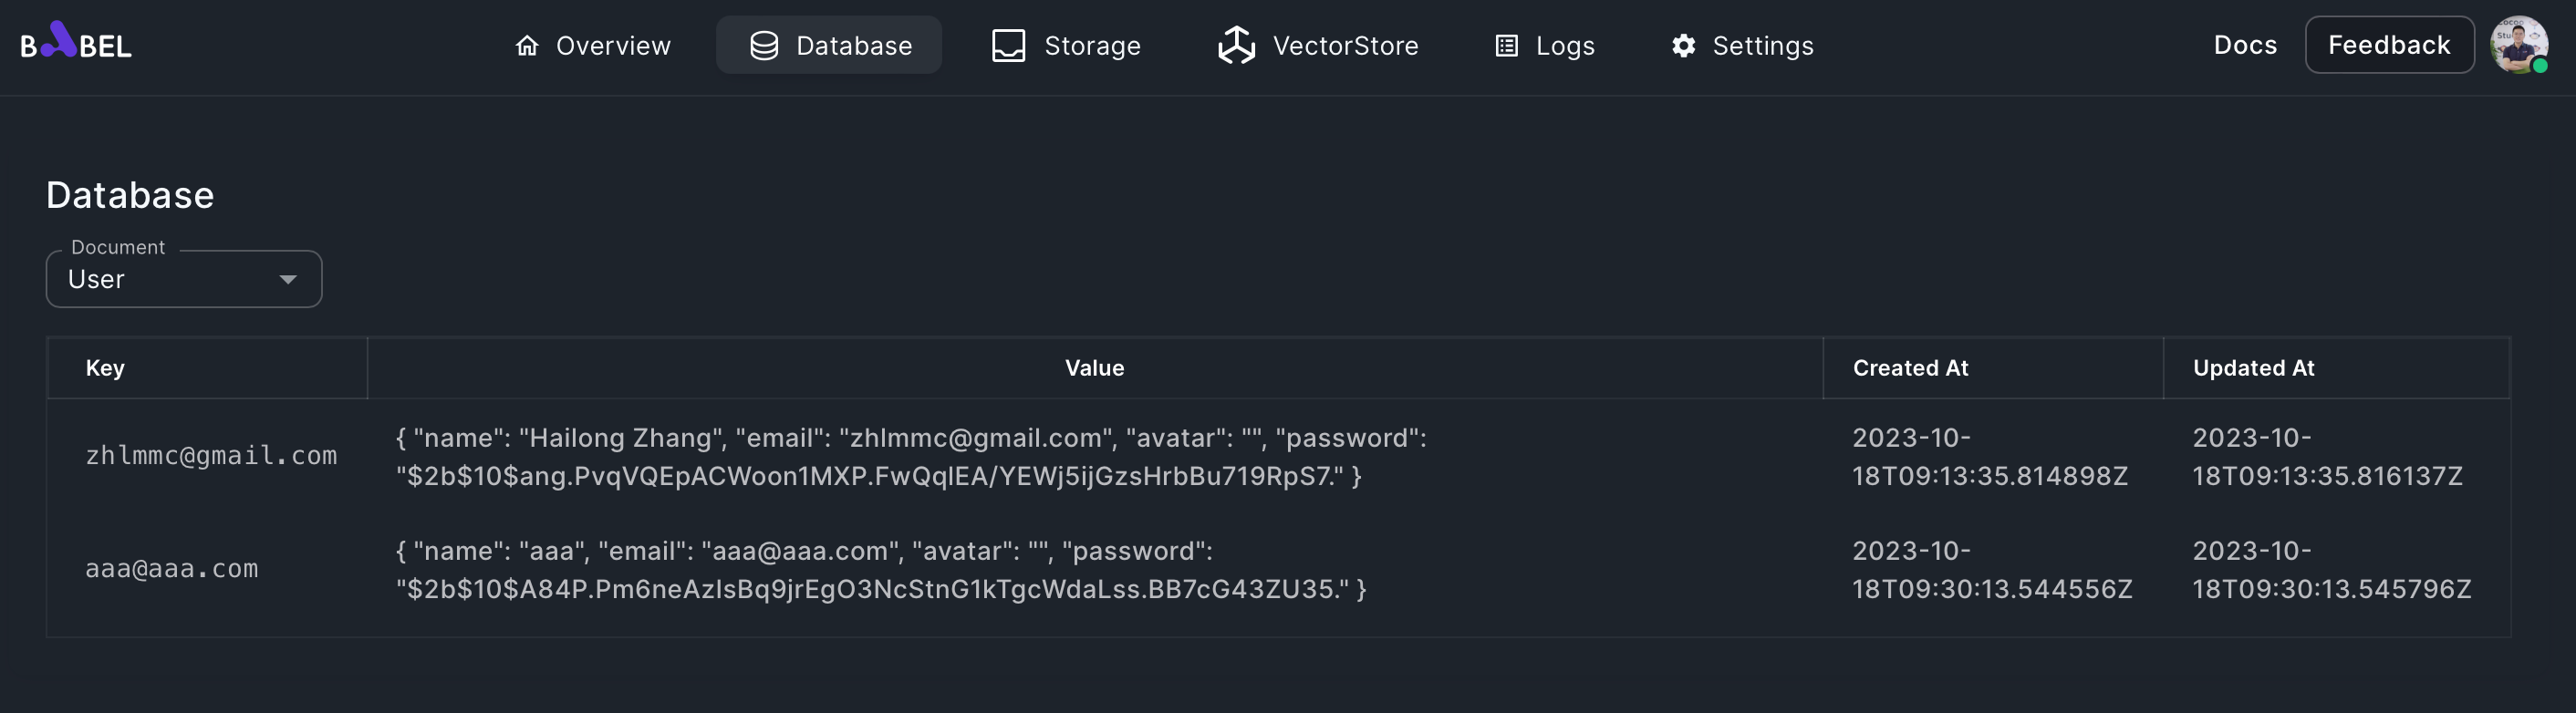
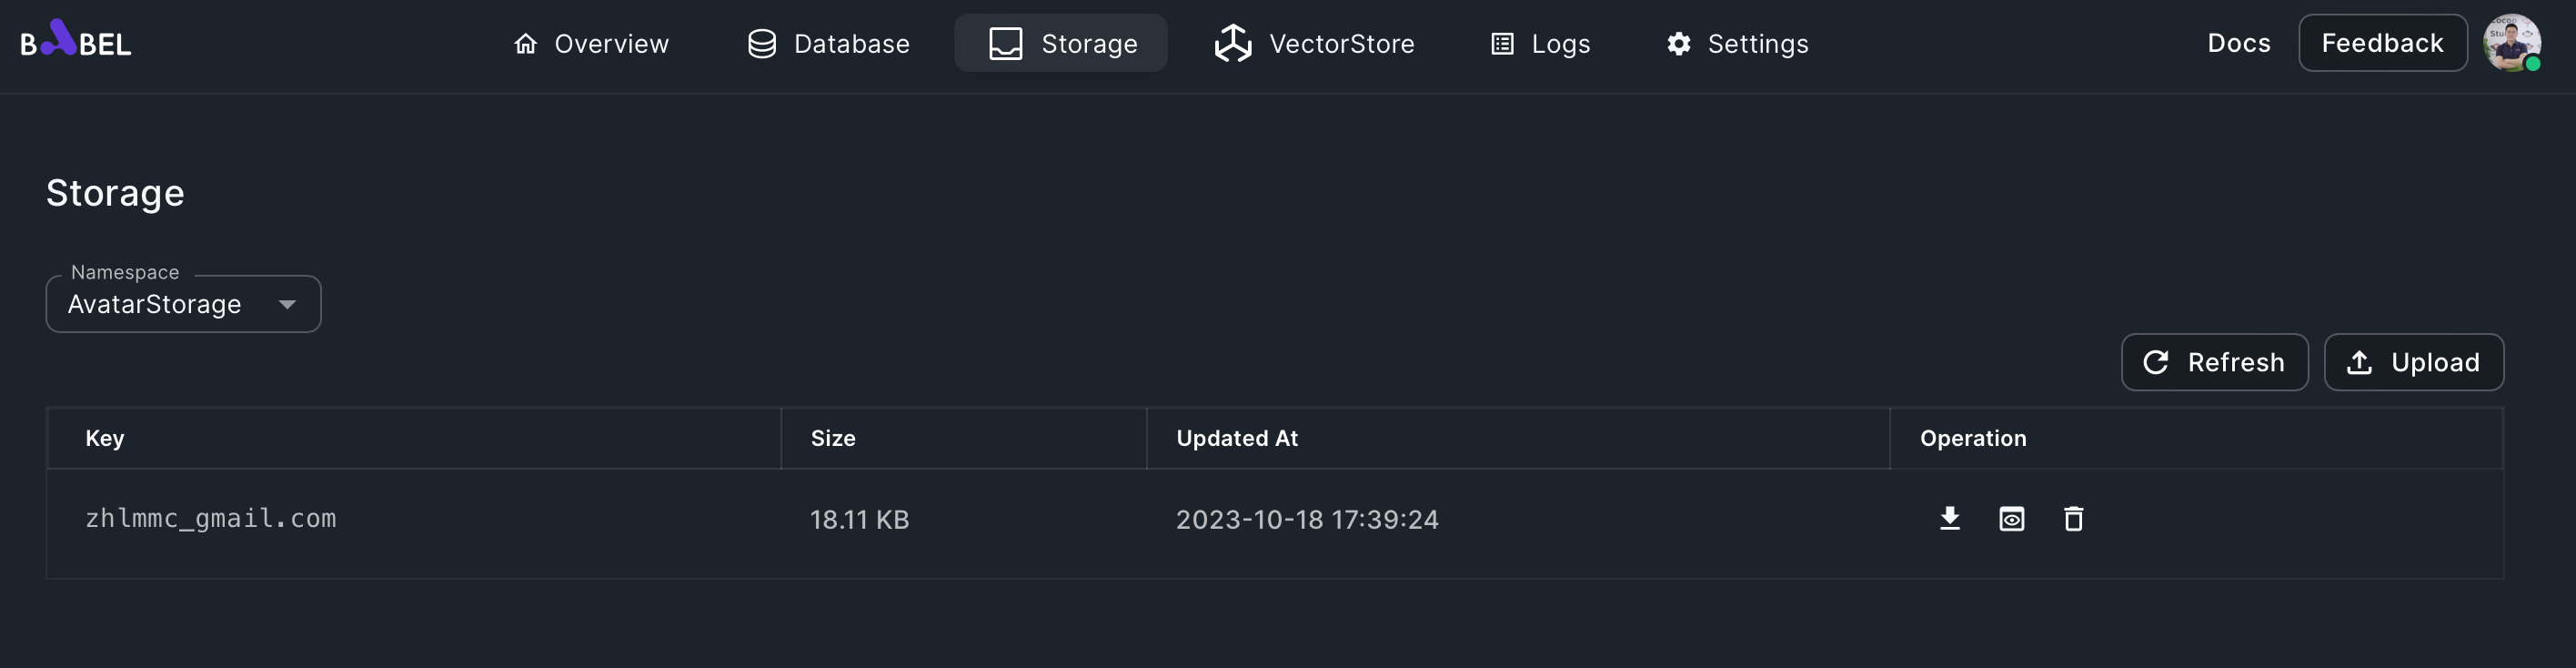
Go back to Babel workspace and clikc the Database and Storage icon on the top-right:
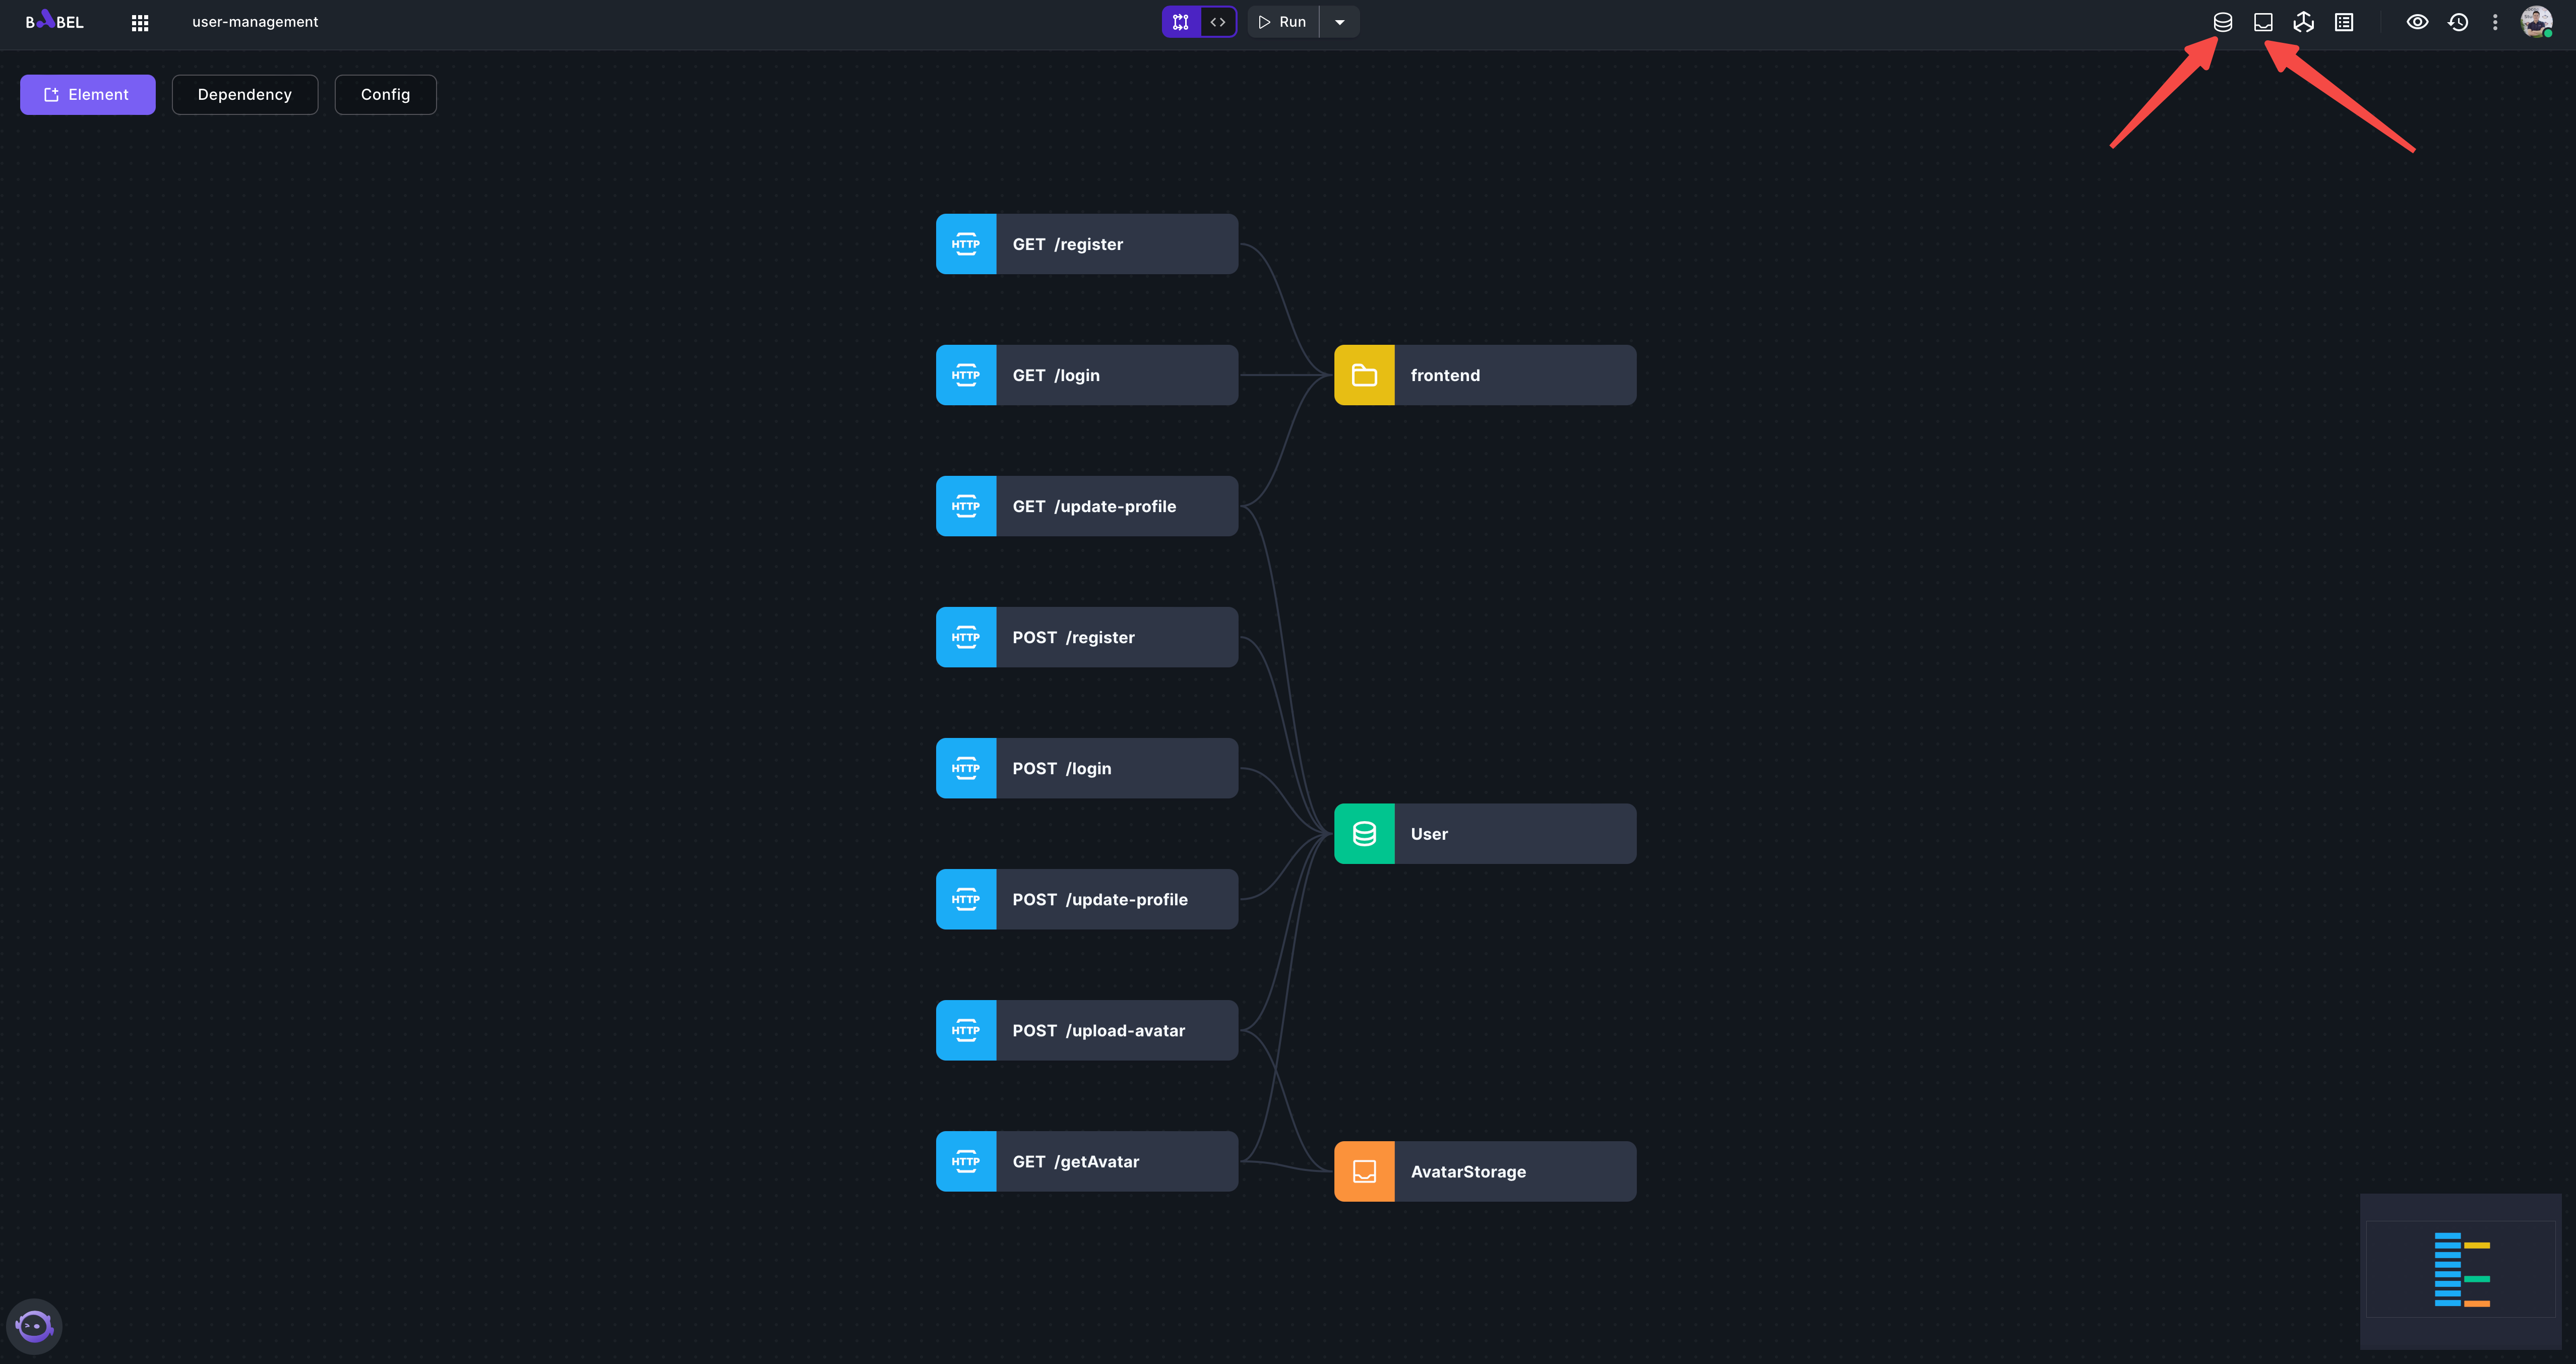
You should see consoles like this: